For January I picked up a D12 with some trepidation and rolled… a 4! Hmm… the Avatar you say? That’s… that’s actually doable!
I’ve had this Avatar since approximately 2008. It’s incredibly cool, but because I refuse to use unpainted models in a game, I have literally never used it. Copying some of the cool looking Avatars I saw some of the top Eldar painters create, I’m going for an “inside out” source lit scheme that tries to give the impression of the Avatar literally being a molten being. This understandably takes a long time to do… though perhaps 10 years is pushing things. Anyway, here is a quick “before” photo:
Getting it out of storage now I note a few things… firstly, most of the skin of the avatar is complete, which is great. This first task isn’t too daunting! Some parts of it though are not very well blended, so need a bit of attention to make the layers smoother (e.g. right bicep).
The right hand is currently stripped back to the resin. I’ve tried and failed on several occasions to turn the right hand into one dripping with gore (he is after all an Avatar of the Bloody Handed God, and I think it would be nice to hark back to the original 2nd edition model). This will need some serious “special effects” attention.
I obviously need to paint the helmet vanes, and find the plume of hair (which I think is already painted, but will need some OSL effects adding so it doesn’t look out of place). The sword is broken and will need a clever repair job and my attempts to use blue for the sword blade (to tie the figure into my Alaitoc Eldar army) were probably a bit misguided so I’ll need to rethink this too.
As for the base, while it’s an interesting idea, the execution is too comic like (both the cracks in the rock and the snow) and I can do a lot better nowadays so I’ll start that from scratch, with the main intention to make the cracks smaller and the overall effect more naturalistic.
Fixing the Wailing Doom
I’ve lost the original tip of the Wailing Doom (the name of the Avatar’s weapon, for the uninitiated), so replaced it with most of a sword blade from a Stormcast Eternal (it is marginally narrower, but has some nice detail). I first cut the Avatar’s sword even shorter – where it had snapped was a weak point in the blade. I pinned the blade in place and then glued wisps from some Undead ghosts to the blade before blending them into the sword with putty, to either be painted as flames, befitting the fact that the Wailing Doom is a melta weapon in game, or ethereal emanations to fit with it’s name.
![]()
After working on this for a bit with the Wailing Doom attached to the Avatar I decided to take the plunge and remove the weapon – both for storage and to make the sculpting and painting easier (while it was attached I lived in constant fear of snapping the sword again in a different location whenever applying pressure to it). Removing the hand at the wrist leaves the best contact point for magnets so I gingerly took a knife to the wrist joint until it was weak enough to snap off cleanly. I then cleaned the surfaces and added magnets – one good thing about resin is it drills much more cleanly than plastic leaving a perfect hole to receive several 3mm and 2mm disc magnets (the former for the wrist and the latter for the hand). It was then I realised I’d stuck them in with the wrong polarity, so had to gouge 3 magnets out of the hand, ruining it in the process and meaning it needed resculpting. I am usually pretty good with getting polarity right – what a model to fail on! In addition to the magnets, I added a wire pin to prevent the joint spinning – without this the magnets can’t hold the weapon upright.
![]()
The sword was the biggest painting job here, a task that seemed to take forever due to the complexity of blending the sword blade itself from dark red to white, and the flames which must meet the sword and start at a bright yellow. Fine for the parts of the blade that are in fact yellow – not so much for the parts that are orange! I don’t think I pulled this off that well, but after countless layers of glazing and shifting the tones from orange to yellow and back again, I’m going to have to say this is “good enough”.
![]()
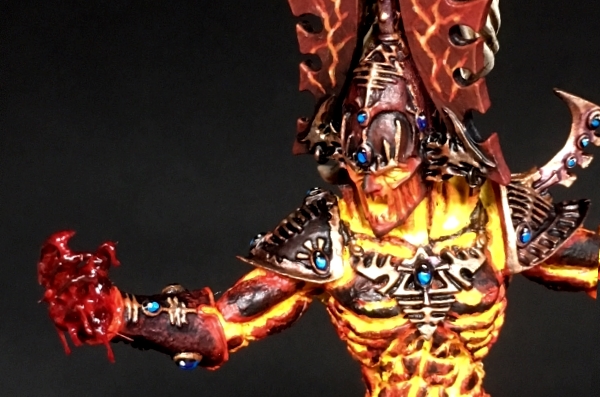
Bloody Hand
I roughly painted the hand with the usual inner glow, from orange to very dark red – precise blending wasn’t required since the hand would mostly be covered in gore later, so I just needed an impression of the light and surfaces underneath to show through. Strings of blood were added by dabbing blood for the blood god onto the hand, then taking a cocktail stick loaded with a dot of superglue, dabbing it into the blood for the blood god and stretching it out. The superglue sets almost instantly so you have to quickly move the string of blood about. I made some strings stretch between the fingers and some drip off the hand. I tried not to go over the top.
Next I added more blood for the blood god thickened with fast tack glue – a sort of PVA glue that is very tacky and fast drying. I applied this over the drips to strengthen them and smooth them out. I paid extra attention to the tips of the drops, adding more of the mixture to get a teardrop type shape.
![]()
Once that was dry it was simply a case of applying a layer of blood for the blood god over the whole hand. As a translucent gloss paint, I waited until after the whole model was varnished with dull cote.
![]()
Loincloth
The fit between the loincloth and avatar on my model wasn’t great, so I ended up magnetising the piece with a couple of 3x1mm magnets located at the groin. This is actually quite useful as I couldn’t decide if I liked the Avatar more with or without the loincloth – having it removable will mean I can change my mind in the future.
Since the loincloth is on fire, I used much the same principle to paint the flames as painting the avatar itself – highlighting inside out from yellow at the base of the flames where they are most concentrated, to red at the tip of the outermost flames. This then had to meet the blue of the loincloth which was a very challenging blend. I first tried to glaze orange and red glow over the blue base but this just looked like an odd stain, so ended up instead blending through purple as an intermediate step then into a dull red for the glow, which worked okay.
![]()
I stuck two different transfers to the loincloth as the basis for the (sightly modified) Avatar symbol, then freehanded the additional bits of the symbol in grey before highlighting those in white. When applying transfers to a shape as complex as the creased, flowing loincloth, it’s essential to make lots of cuts in the surface of the transfer film so that the various parts of the symbol can conform to the surface relatively independently, and to make liberal use of transfer setting agents that soften and dissolve the film. Because these agents dissolve paint, I gloss varnished the loincloth before applying them, then apply the setting agent to the model where it can act as a carrier while you push the transfer into place, and start to dissolve the film from below. Once in place, I apply more of the setting agent to the top of the transfer, leave it for a while then come back with a cotton bud to soak up excess liquid and adhere the transfer to the surface. Once that is dry, another coat of gloss varnish protects the transfer (and the model will later get a coat of dullcote to take the sheen away).
Painting
I found the Avatar’s “mane” and as I thought it was already painted. After fixing it in place I just glazed some red, orange and yellow glow onto the hair where it faced the Avatar’s back, using the bone colour to knock back and blend in the glow whenever I went a little heavy handed with it.
A few other touch ups here and there were needed, like repainting the leather strap and white Aspect symbols brass (more logical on a molten being and less colours to clutter up the model), repainting the vanes on the side of his head to a plain, graduated dark red and then freehanding some burning lightning patterns and a few gems I’d missed here and there. The face had been very roughly blended and I pretty much started again with this.
Fixing the Base
I glued two bits of sprue to a new base as anchor points for the feet, and drilled holes to receive pins. The old base was made with a layer of insulation foam that I carved the cracks into; this time, I built up the surface of the base with torn chunks of cork. I followed the same impact pattern as last time but with much finer cracks. Building the surface took a couple of hours, individually tearing and fitting each piece one at a time and fixing it in place with superglue.
I painted it black and added some light washes of green and red to vary the rock hue slightly, then drybrushed up to a very dry drybrush of white. The skulls received eerie blue-green glazes and individual highlighting. I decided not to add lava to the base like the old one, but instead drybrushed on a glow emanating from the Avatar with red and orange. Some tufts of various grasses and some blended turf finished the based for the timebeing (I will likely later add snow and icicles, which is why it looks a little plain at the moment).
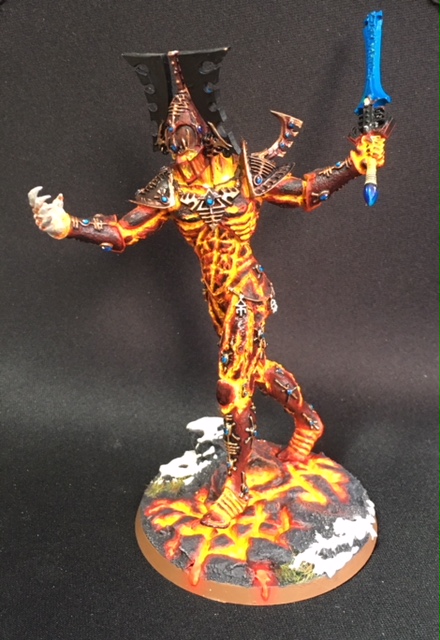
Here’s the final model, having been gloss coated for protection and lacquered with dullcote for the best finish, completed at last after 11 years!
![]()
![]()
![]()
![]()
![]()
Markus Purdy
Job very well done! Great to see the finished piece after digging through your original posts in the Dark City on this.
Keep up the good work!
Ryan
Beautiful Avatar model! Thanks for all the eldar tips, very helpful.