
2020 was probably one of my worst years in terms of hobby productivity. I had a good first three months of the year, but once lockdown hit I lost all motivation and didn’t feel like doing anything until Christmas. Then the bug bit me again and I picked up a project I’d started about a year before: Gaslands jersey barriers.
Like my machine gun turrets, these barriers are made from plaster of paris. This is an outstanding material for making concrete terrain as it mimics the appearance of concrete very well. It’s also perfect for making anything that needs to be replicated again and again, which barriers obviously do – I calculated I’d need at least 24 barriers to ring an arena layout for Gaslands. This tutorial will also work well for many other games (I’ll definitely use the barriers for 40k and kill team too, at least the ones without the corporate adverts on anyway).
This article first covers how I made the mould and cast the barriers, then I’ll talk a bit about the various finishes I applied. Since this is quite long and meandering, for clarity the process for a single barrier is:
- Cast a barrier from plaster of paris
- Gouge and scrape “old” damage, cracks and bullet holes
- If wanted, superglue bits of wire into the barrier to represent rebar (steel bars or mesh cast into the barrier to strengthen it). I added rebar to about half of my barriers, as it looks really cool when rusted up later.
- If wanted, either paint hazard stripes on the face of the barrier or use a reverse transfer method to add advertising/sponsor banners. I did hazard stripes on about a third or my barriers and ads on another third.
- Apply an all over wash of watered down black, brown and green, and use a cloth to remove excess, make basic streaks and patterns and buff some of the surfaces back to a lighter colour
- Apply further weathering such as rust, dirt and grime
- Gouge and scrape “new” damage, cracks and bullet holes

Mould making
The first step is to make a mould. I had intended to first make a master barrier from plasticard, and make a silicon mould from this, but my plasticard fabrication skills are not precise enough so my attempts invariably ended up lopsided or asymmetrical. For something that is supposedly mass produced for use in road works and building sites all over the world, this would never do.
Eventually instead of making a silicon mould from a master, I decided to build the mould directly, using Lego, in effect building a negative of the barrier. I found the advantage of doing it this way is it’s easier to make the barrier symmetrical because I used the Lego to construct a perfectly square basic cuboid on top of a flat plasticard base, then plasticard to build in the sloped sides and additional details within this.
The photo below shows the mould after it’s seen a fair bit of action. You’ll notice that I’ve cut off the nubbins from the top of the bricks around the edges of the mould – this is to allow the use of a scraper to skim off excess plaster from what will become the bottom of the barrier, meaning it will set with a nice flat bottom.
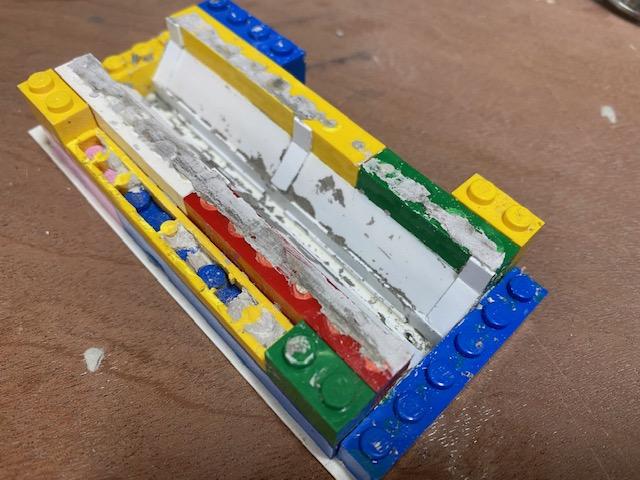
I also made the two edge bricks on the end removable to aid removing the barriers (the rest of the mould is superglued together). When removing a cast, I would then stick additional bricks to each corner, meaning I could forcefully tap the mould face down onto the worktop to get it to drop out.
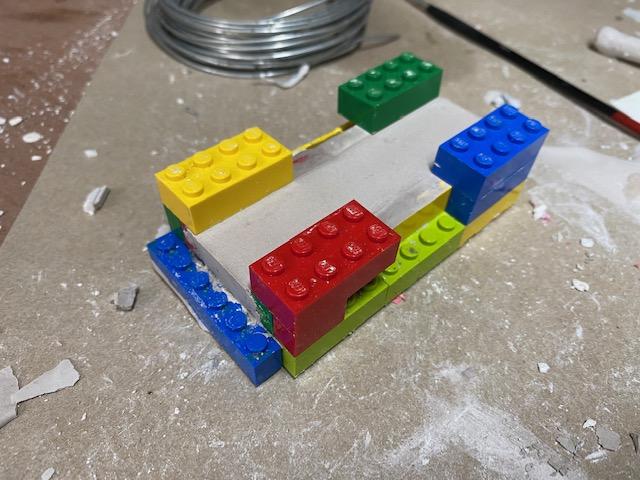
This photo shows a jersey barrier ready to be removed from the mould with the end bricks taken off and the corner bricks added on.
Casting the barriers
With the mould ready it’s basically a case of mixing up some dirty brown water with a little black and yellow ochre paint, mixing in some plaster of paris to a thick consistency and pouring/scooping it into the mould (which I first sprayed with a light coat of release agent). I then tap the mould a couple of times on the worktop, scrape off the excess using a flat edge and leave it to dry. You can accelerate the drying by putting it on top of a radiator – I’d generally be able to turn out about 3 per day, even in the cold winter, meaning my 24 barriers were easily churned out in a couple of weeks.
As plaster is quite fragile for the first few days of its existence, some of the barriers would break as they came out of the mould, or they would come out incomplete (the top “rail” of my barriers was particularly susceptible to being damaged). As I’m making crumbling, bashed up and shot up barriers that will have large amounts of damage, I didn’t care too much if the barriers come out in pieces. If you want more pristine barriers, then do make sure you leave them an extra long time to dry, probably over night on a radiator.
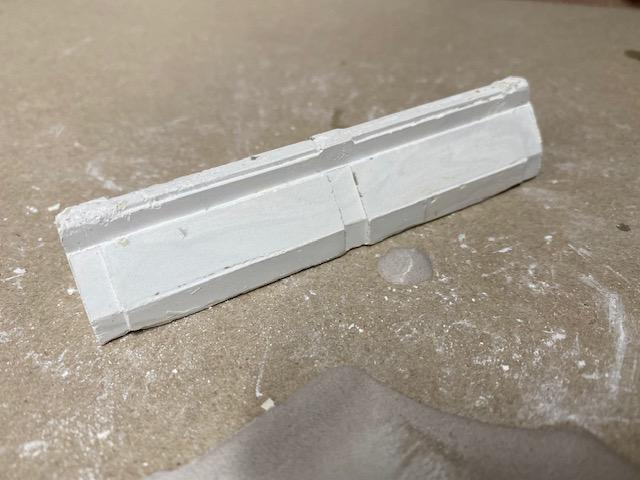
Most though come out looking pretty clean, like this:
From this point on, I gave the barriers one of two different finishes – either painted on hazard lines, or faded ads.
Adding damage, cracks and bullet holes
You will want to do this pretty much straight away. Once the plaster has time to harden fully it becomes a bit more difficult to get the effect of bullet holes and cracks quite so easily. Fresh out of the mould the plaster is still quite soft so making convincing looking bullet holes is simply a matter of drilling into the surface with a scalpel, first at a high angle to make the deep bullet hole itself, then at a lower angle to gouge out the shallower impact crater. I sometimes add the suggestion of starburst lines with the tip of the scalpel.
Cracks, scratches and gouges are equally easy to scribe in with the tip of a sharp knife. Bigger areas of damage can be dug out with a box cutter.
Obviously this photo is from a later stage once weathering was applied, but it shows some of the range of effects that are possible.

Whenever the damage I made to the concrete barriers was big enough, I would also drill a hole and superglue a little length of twisted wire to represent the reinforcing rebar inside the barriers.
Adding faded hoardings to barriers
I used a method for transferring printed designs onto surfaces that is widely used in crafts. The first step is to collect a few different designs and reverse these. I used a combination of popular sci-fi corporate logos (OCP, Weyland Utani, Nuka Cola), Gaslands sponsor banners (Miyazaki, as the only one I’m aware of having a commonly accepted look for it’s banners, although I used two variants) and generic sci-fi corporation logos found in image searches. Each graphic was sized to 4cm wide and reversed by flipping it horizontally, printed out on normal printer paper, then individually cut out.
I then applied a thick layer of gloss varnish to the surface where the hoarding would appear, and smoothed the graphic printed side down into the varnish. Note: for this technique I believe acrylic gel medium (gloss or matte) is more commonly used, but I didn’t have this so I experimented with using gloss varnish, acrylic matte medium and PVA. Gloss varnish did the best job of transferring the graphic to the barriers.
Once dry, you then soak the paper with water and gently rub at the paper with a damp sponge or cloth. As you do this the paper will gradually rub away, leaving much of the ink on the surface of the barrier and revealing your now un-reversed design.
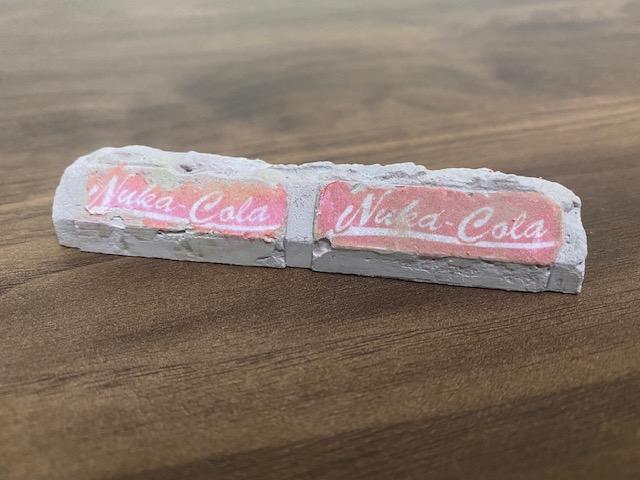
Above is a barrier with two Nuka Cola hoardings, once the paper has been rubbed away and everything has dried. As you can see, by it’s nature this is an imperfect art – you’ll often end up tearing or flaking away bits of the actual design, and it is far from a perfect transfer of the graphic at the best of times. Once the water has dried, the design will appear quite faded, as though it’s been sat in the sun for years. All the better for my purposes as this makes the graphics look ancient and weathered.
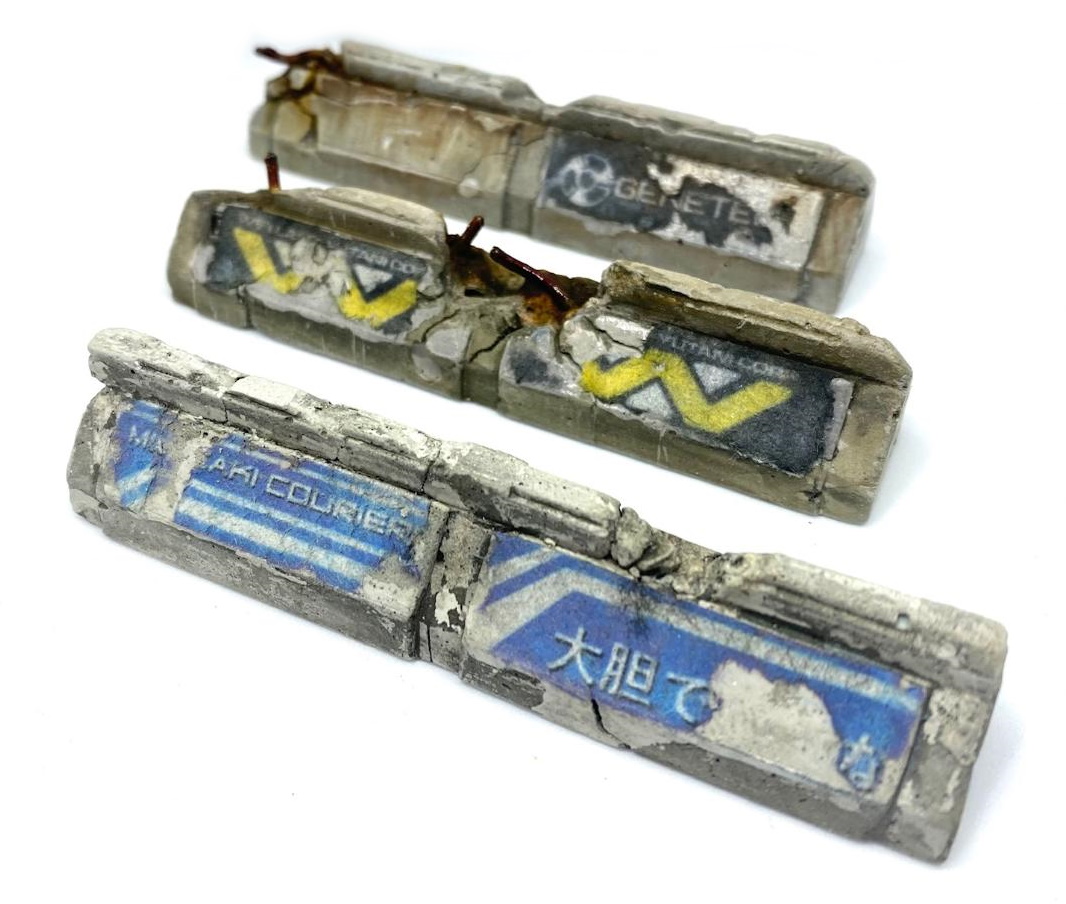
Here’s what they then look like once weathered (Miyazaki, Weyland-Utani and Genetech ads):
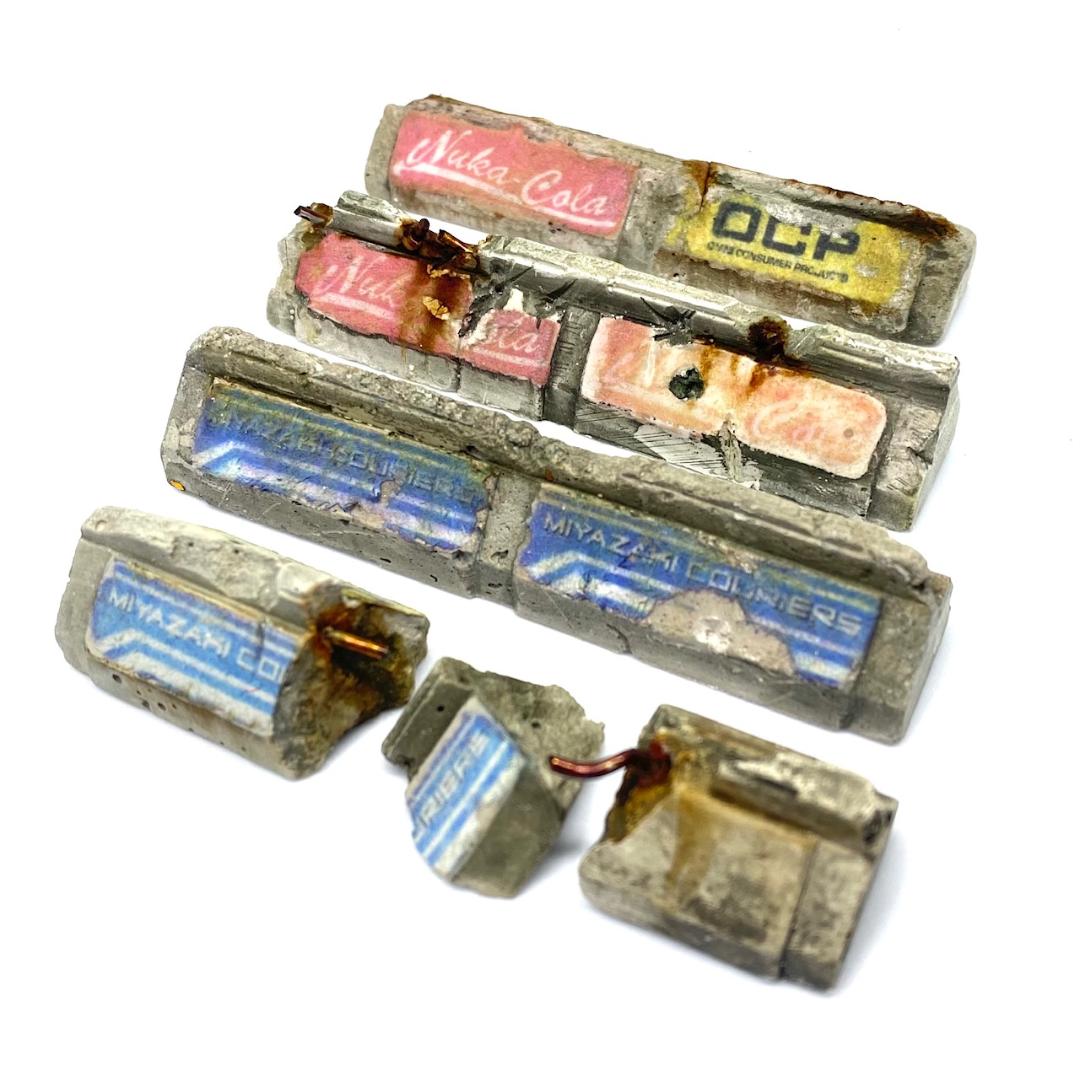
Below, more Miyazaki, alongside Nuka Cola and OCP. In my opinion it’s more convincing if the same graphics appear again and again – like a contemporary F1 circuit, sponsors like to get their message firmly across, so you tend to see a small handful of sponsors repeated multiple times rather than dozens with only one or two ads each.
I REALLY enjoyed this process. It has the “thrill of the reveal” – that bit where you peel, rub or otherwise remove something to reveal the finished effect – which never fails to excite me. And I think the finished effect is very convincing. This is a technique I’ll be using again for sure.
Hazard stripes
I imagined these to be hand painted by Gaslands organisers. As such, the paint job was fairly rough and ready. These start with a flat-ish coat of yellow Citadel paint, then black stripes. You could hand paint these if you’re confident about your ability to paint evenly spaced and straight lines, but I didn’t fancy that. I made a quick mask out of plasticard which I could just hold over each barrier (this seemed quicker than individually masking each barrier).
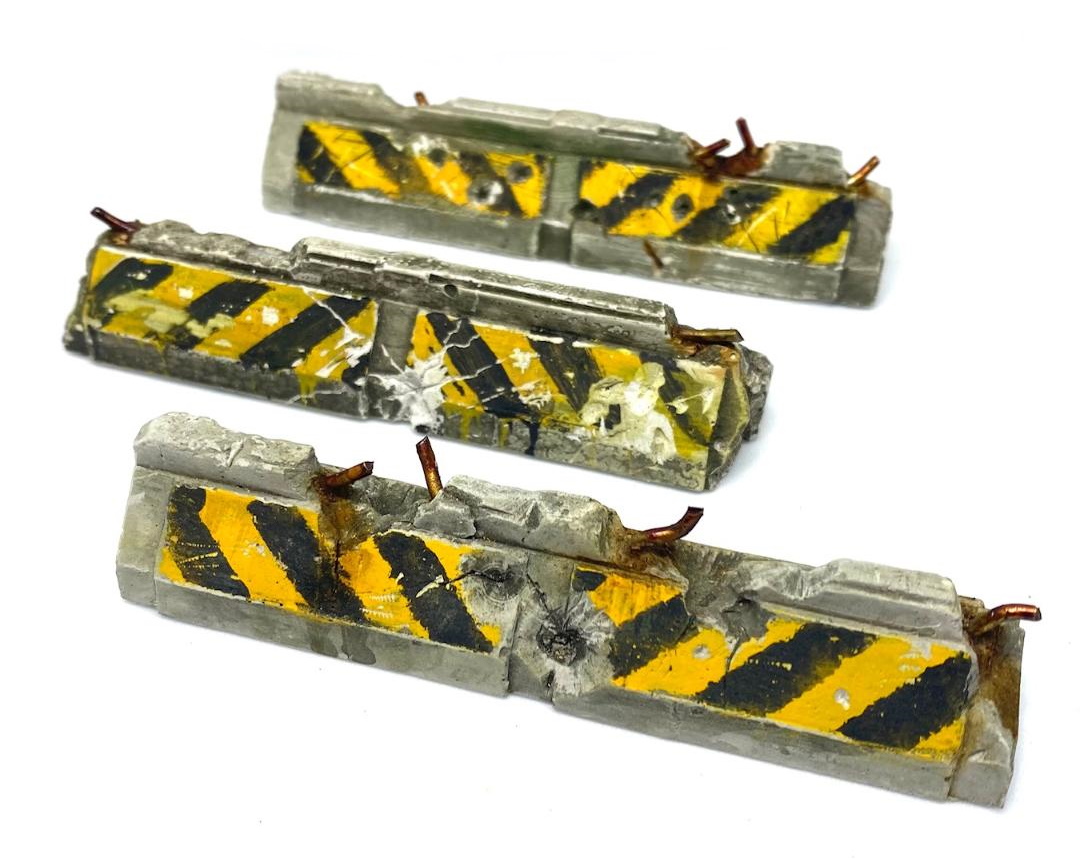
Even when fairly roughly painted these looked far too clean, so after painting the hazard stripes I added more battle damage in the form of bullet holes, scratches and gouges which would then be dulled down by the next step (weathering). On some barriers I also painted small drips of black and yellow paint where the organisers had not been particularly careful about keeping the paint neat.
Weathering
As I said at the start most of the weathering work is a very simple series of dirty washes of brown, black and green (dirty paint pot water often does it), which is then rubbed off in places with a damp cloth to remove excess wash, bring back highlights to the edges and prominent surfaces, and add texture and direction to the washes. The whole barrier (hazard stripes, hoardings and all) received this treatment and there isn’t a lot to say about this beyond
There are a couple of things to point out though:
- I looked at some photos of real life aged jersey barriers and saw that they often exhibit streaks of grime on the vertical surfaces. I mimic this by soaking the surface in question with water, then painting a thin band of brown paint along the top edge of the surface, then taking a clean but scrubby brush and streaking the paint down the surface with short strokes. If at any point you go overboard with the brown you can always use a damp cloth to wipe some of it off.
- For rust I use Modelmates rust effects. This is a seriously good paint to own for any Gaslands hobbyist, and beats trying to paint rust on with normal paint hands down. An absolute must in my opinion. I wasn’t shy about dousing the rebar with it and would let it leak into the surrounding concrete and over the edges of the barriers, sometimes helping it streak down the face of the barrier. The rich rust colour is a lovely contrast with the grey concrete.
- Once I’d finished with the washes and other effects I went back over with the edge of a knife to lightly scrape some of the most prominent edges back to the plaster. This basically did the sort of edge highlighting you might get from a drybrush, but quicker and easier. At the same time of course I also used the knife to gouge some fresh battle damage into the barriers.