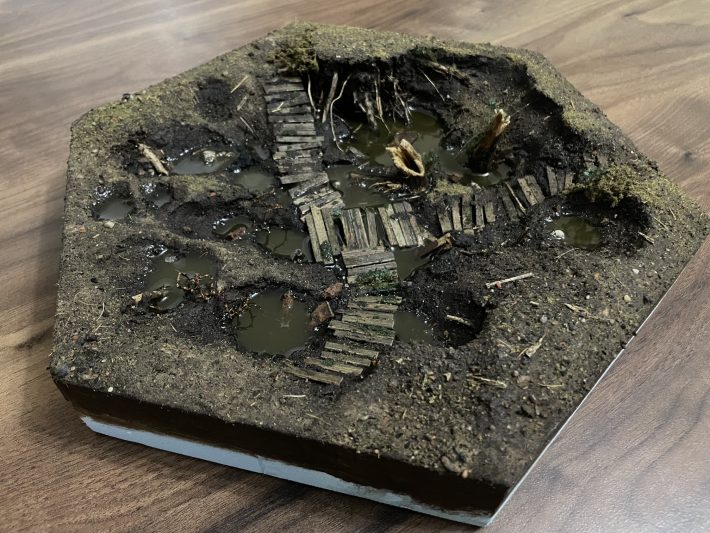
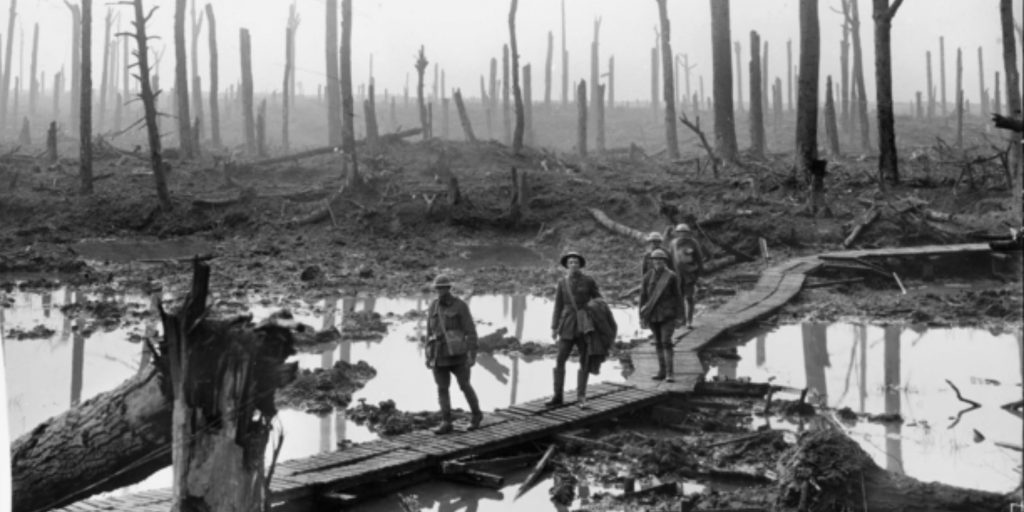
Instead of my typical freeform ramblings, this is a structured step by step piece where I run through how I build a trench tile from start to finish. I had in mind a particular photo from WW1, below, which I will in some way attempt to honour. The general idea obviously is a wracked landscape, waterlogged with some makeshift walkways to allow infantry to cross.
I start by making what I call the “blank”. This is fundamentally a blank hexagon, with the barest minimum of contours. In this case, given my inspiration, it has to be a low lying tile – but I mustn’t lose sight of the fact that all tiles need to be the same consistent height at the edges so the line up, meaning all the low lying land will need to be in the centre of the tile.
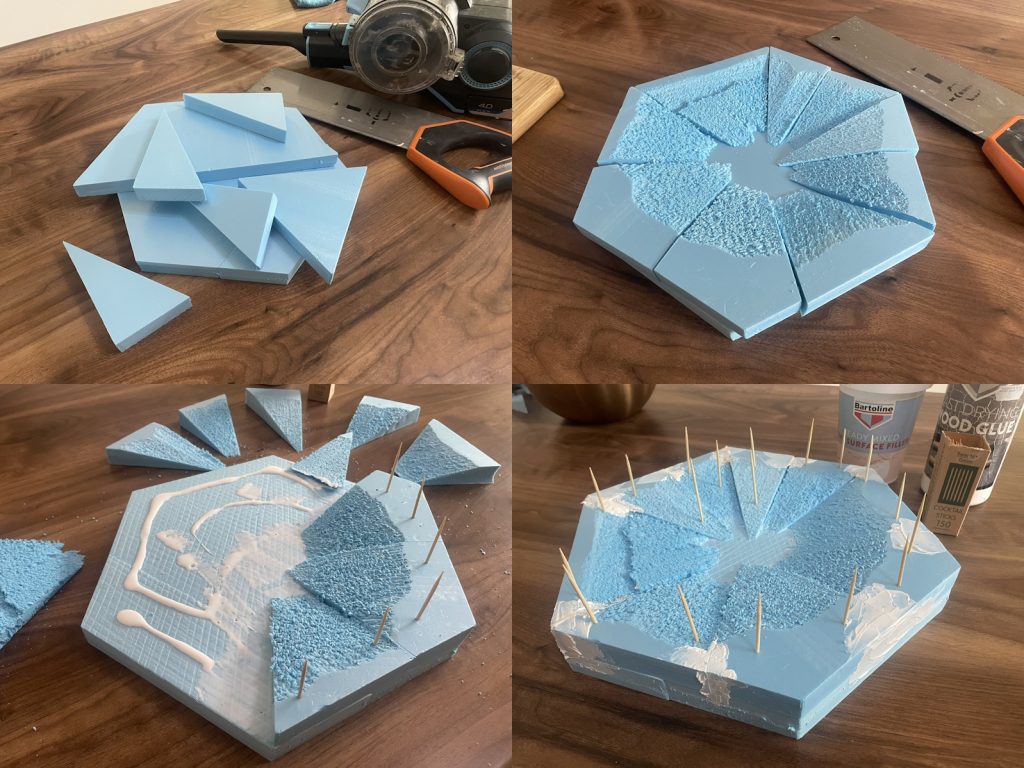
I’ve built the actual tile from two half hexagons and a number of offcuts (1). You can read about how I actually cut up the half or full hexagons here – though I’ve eased up on the pursuit of total accuracy largely as I’ve realised it’s impossible to achieve with my cutting method. I use a tenon saw to slice the offcuts into wedges to form the basic contours, and after a dry fit (2), I glue the sheets of styrene together either with a hot glue gun or PVA. If using PVA, some cocktail sticks serve to keep everything clamped in place while the glue dries (3). I’ve also done some basic filling with wall filler (4).
Next it’s on to landscaping, which will be achieve with two simple tools – a lighter (a small heat gun would be better, but I don’t have one) and some modelling compoung, which is basically a mixture of shredded tissue paper and plaster of paris.
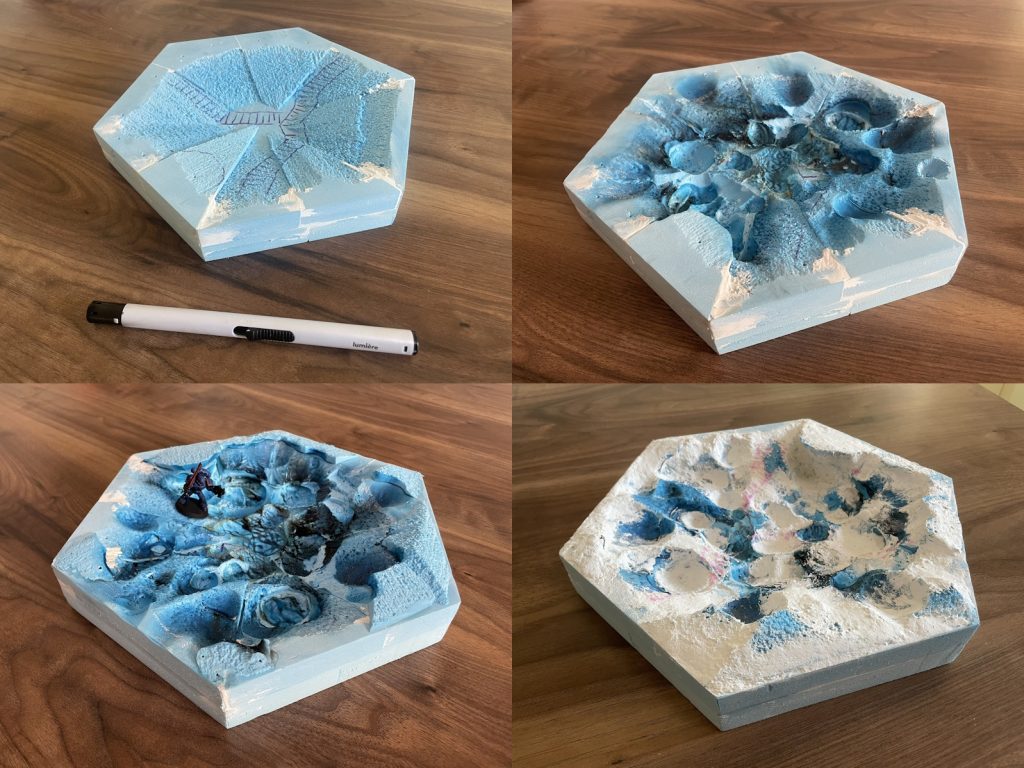
I’ve drawn a rough idea of the features (5), then immediately eradicated almost every trace of the drawing by burning divots, gulleys and craters into it with the lighter (6). Do this step outside to avoid fumes, and go little by little – you don’t want to set the thing on fire (though it happens occasionally). In the next step, the piece was feeling a bit one dimensional only having relief features (that is, below the edge of the tile) so I started to layer in some additional styrene at the edges to create parts of the tile that stand proud of the surrounding landscape (7). This has the benefit of making the low parts look even lower too. Once I was happy with all that, the final stage in landscaping is to use the modelling compound to smooth out the terrain features, add transitions between high and low parts, and fill in any craters where I got a bit trigger happy with the lighter (8).
Finally we’re on to finishing. This starts with a hard wearing coat of mod podge mixed 50/50 with burnt umber acrylic (9). Paint this part way down the sides too, so that the gaps between tiles are not too conspicuous. Over this will be layered various mud texture pastes, scatter materials and any man made features.
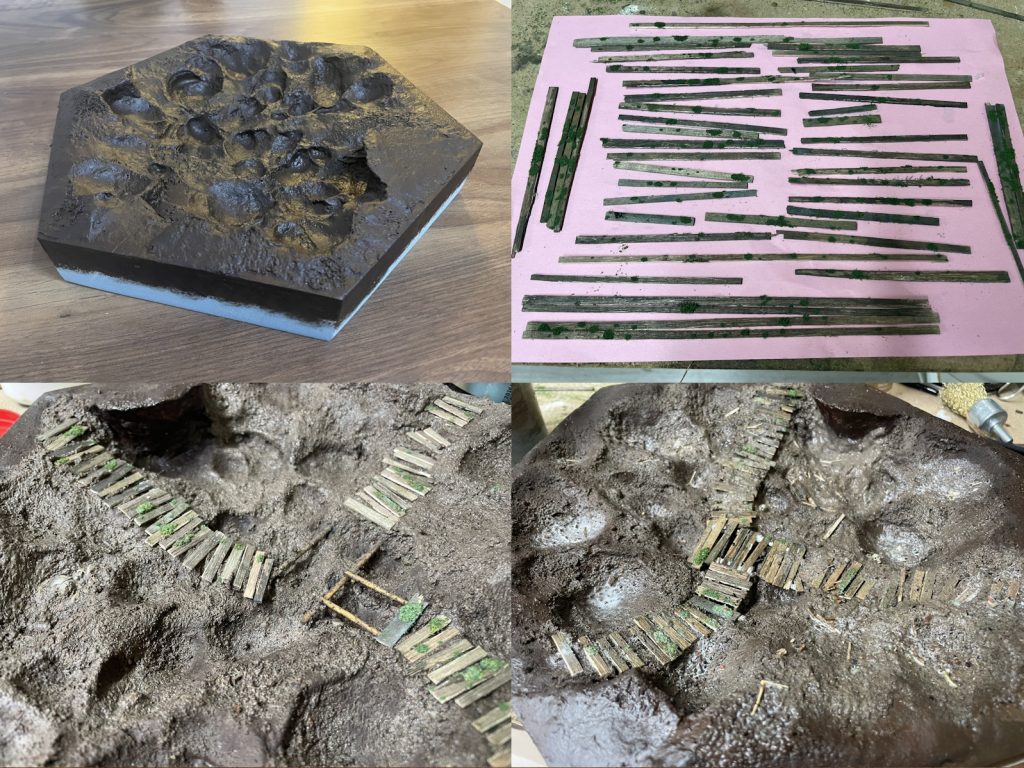
In this case the main feature is the wooden walkways. I find it useful to have a stash of pre-painted wooden planks for this project. I started by cutting a large number of balsa wood strips and staining them with muddy black, green and brown washes. These are then lined up on a piece of paper and spattered with mod podge from a height – this leaves a random pattern of glue dots for some green flock to adhere to, representing moss growing on the wood (10).
I mix a dark mud paste and a light mud paste. I need a lot for this project, so decided to make my own instead of buying expensive mud pastes. The recipes are as follows:
- Dark/wet mud paste
- 2 parts woodland scenics realistic water
- 2 parts PVA glue
- 2 parts used and sterilised espresso coffee (cooked on a baking tray in the oven)
- 1 part mixed sand/gravel
- Lighter and drier mud paste
- 2 parts woodland scenics realistic water
- 2 parts mod podge
- 2 parts used and sterilised espresso coffee
- 1 part mixed sand/gravel
- Enough light brown paint pigment to noticeably but not overly lighten the mix – about half to 1 teaspoon seems to do it if a “part” above is a tablespoon (by rights, this should be more scientific – I have tiles of slightly varying tones as a result of not properly recording my mixture).
You’ll need to let both pastes down with a spot of water until they are spreadable/paintable as needed. They keep well in a sealed container as long as you periodically add a bit more water.
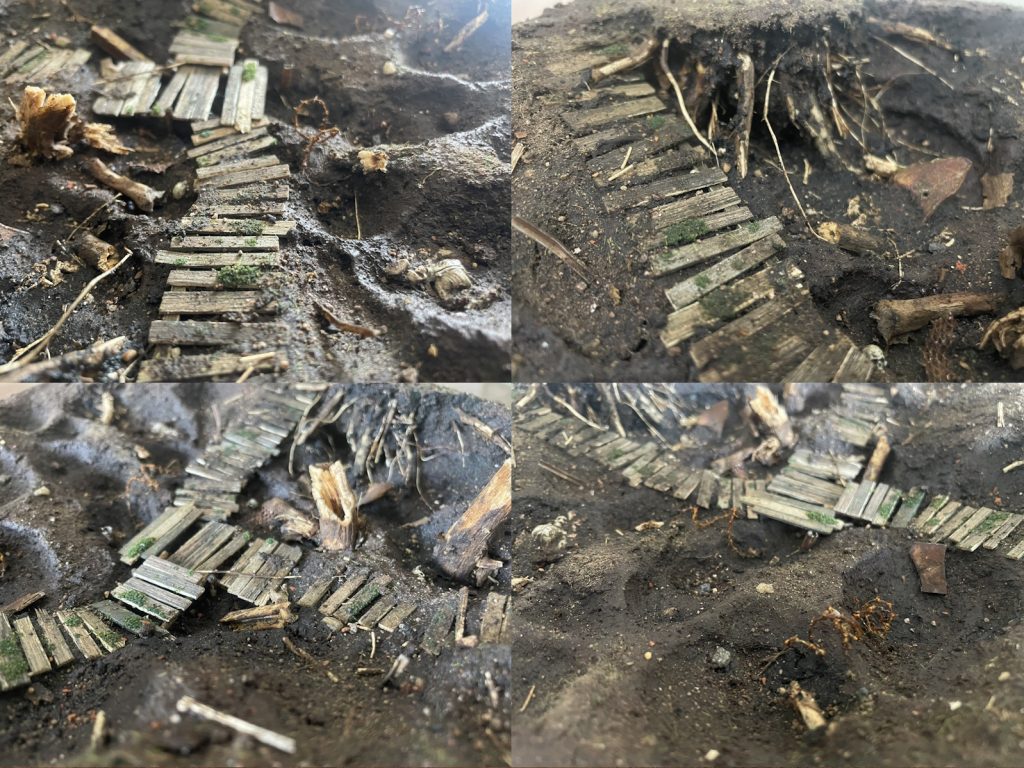
First up it’s dark mud paste, this goes into all craters and large divots, under and around where scenics will go, and in the bottom of trenches. Into this I set pre-painted wooden planks, twisted bits of metal, barbed wire, skulls and anything else that will be dotted about (11 and 12). Since making this tutorial, I’ve actually changed my method to use a hot glue gun to glue the planks and major features down before the mud paste – it’s faster, and easy enough to push and wash the mud paste in and around these features with a wet brush after application.
Then the light mud paste gets applied on the more raised patches of ground, around the rims of craters etc. Use a little water to feather it in to the dark areas slightly so the edge is not too stark. While this is wet, apply scatter material – I use a combination of dried earth from the garden, dried seagrass, mixed mud and earth coloured sand and gravel and flocks in a couple of shades of green (keeping the flock to a minimum).
Once all scatter material is glued in place, the final step is to use some resin to fill in the craters and other low lying ground with filthy water.

For this, I found an ideal pigment among my supplies called “muddy green”. I experimented to find a good ratio of 1/16th of a teaspoon in 45ml of prepared resin (I actually have a 1/8th teaspoon measurer, hence using this unit).
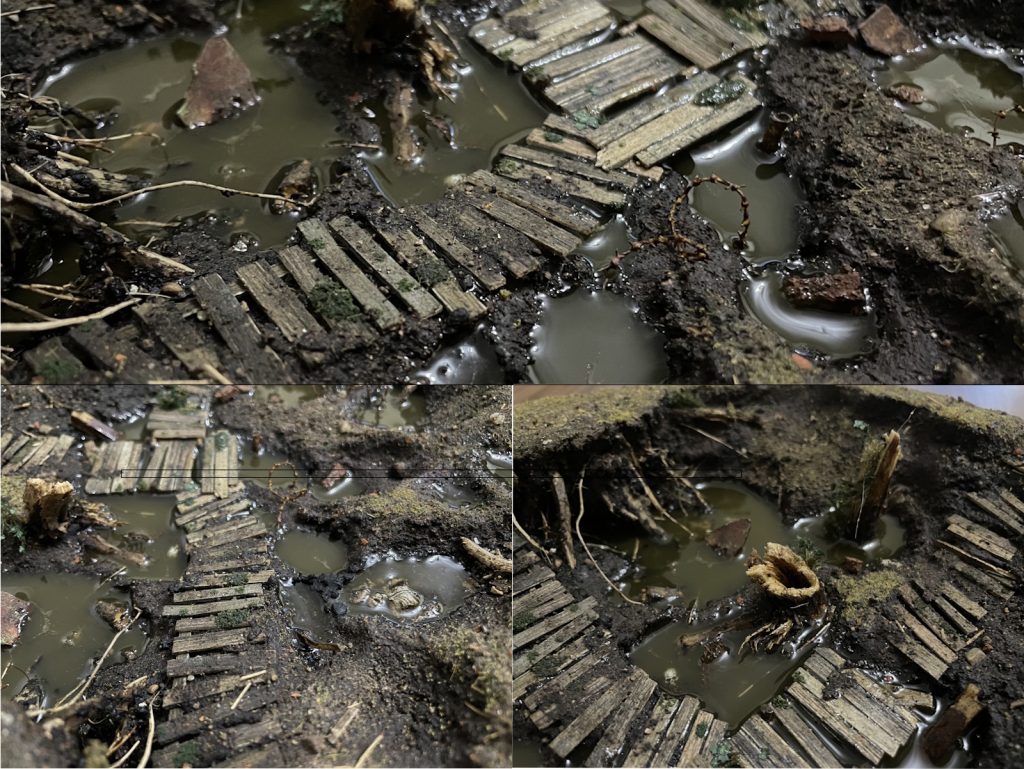
I pour deep areas in multiple passes so there is usually around 3-4mm deep at most at any one time. After each pour, I play the lighter over the surface to pop most bubbles.