This is my first “better jetbike” design from 2009, a very long time indeed before Games Workshop released the modern jetbike. I include the post only to show the genesis of the whole Jetbike project but it’s not actually the way I would recommend converting Eldar jetbikes nowadays.
Posts after this one pick the story back up 4 years later when I attempt to improve on the design and actually cast the thing. This post (and indeed most of the rest of the posts in this log) first appeared in my Warseer Eldar thread (RIP).
—
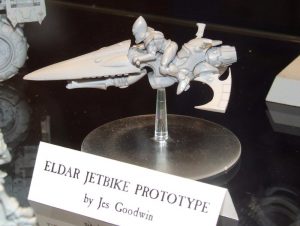
The goal of the tutorial is to make something similar to this Jes Goodwin concept model that never became reality:
Parts List
Most of the parts that are required in addition to the Eldar jetbike, with the notable exception of the Reaver Jetbike hull, should be in most self respecting Eldar bits boxes and fairly easy to lay your hands on. To build this conversion you will need:
Eldar Jetbike
- 1 x Jetbike Canopy
- 1 x Jetbike Hull
- 1 x Jetbike Vents & Fins
- 1 x Jetbike Shuriken Catapults
Dark Eldar Reaver Jetbike
- 1 x Reaver Hull
Eldar Falcon
- 1 x Falcon Pilot Arms & Console
- 1 x Hull Mounted Shuriken Cannon (for Shrieker Jetbike)
- 1 x Turret Mounted Shuriken Cannon Accessory
Eldar Guardians
- 1 x Pair of Guardian Legs
- 1 x Guardian Torso
- 1 x Guardian Helm
- 1 x Pair of Guardian Sensor Vanes
I recommend trying to get your hands on the Reaver hull from a bits website or a trade rather than buying the complete Reaver kit (unless of course you can make good use of the other bits that come with it).
—
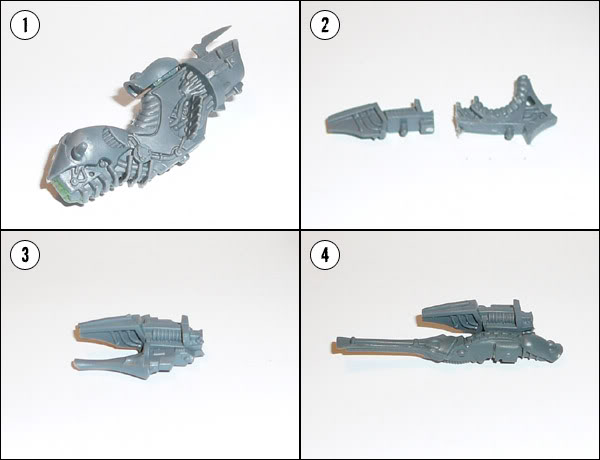
Step 1 – Assemble the two halves of the Reaver hull as usual, then plug the open end with plenty of green stuff. Stick the shuriken cannon accessory behind the jetbike seat so that the line at the front of the accessory forms a continuation of the hull lines surrounding the seat.
Step 2 – Cut the Eldar Jetbike hull in half just in front of the peg where the Jetbike handles would normally be located. Clean up the front end of the cut. You don’t need the back end so this can be discarded.
Step 3/4 – Glue the Jetbike shuriken catapults to the front of the hull as usual. If you want to make a Shrieker Jetbike instead, simply glue the Falcon hull shuriken catapult in place as shown – you’ll need to remove the peg where the catapults normally go and possibly do a little filing to get a good fit, but otherwise these parts fit like a dream.
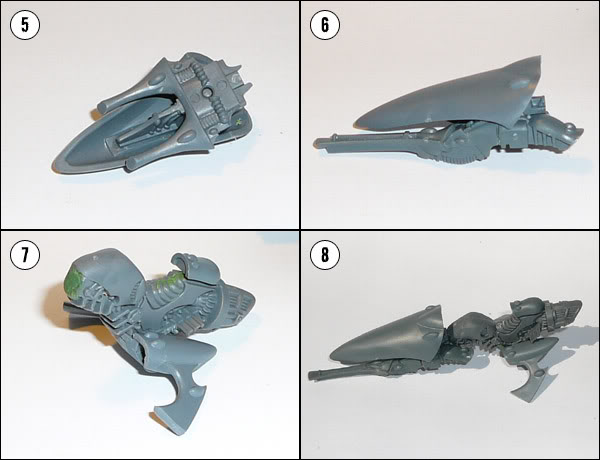
Step 5/6 – Glue the Jetbike canopy in place as normal.
Step 7 – Glue together the two halves of the Jetbike fins and vents, then cut off the everything in front of the vents (the part including the foot rests). File down the channel between the two Jetbike vents so that it’s flat and glue the completed vents to the bottom of the Reaver hull, under the foot rests. Note: You’ll need to gently remove or file down some of the engine detailing under the foot rests and trim down the foot rests themselves for the vents to fit properly. At this stage also cut, scrape, file and sand down the Dark Eldar detailing on the fuel tank so that it’s nice and smooth.
Step 8 – Pin together the two halves of your Jetbike to make a good strong joint.
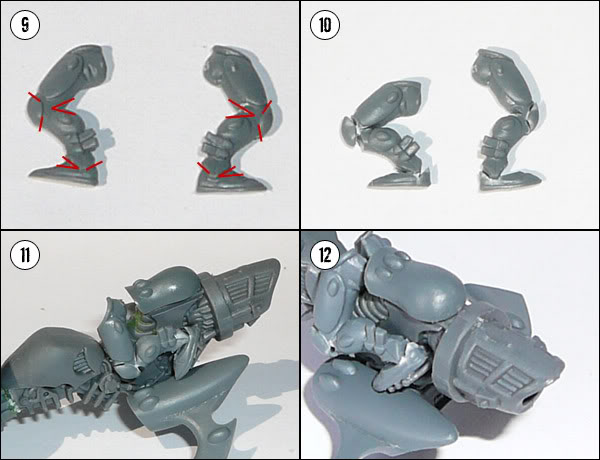
Step 9 – Now it’s time to move on to the rider, and we’ll start with the legs. For this you could feasibly use the Reaver pilot legs, which are already in the correct pose. However on balance I think it’s easier to cut and repose some normal Guardian legs than it is to detail up the Dark Eldar legs to look like Guardian legs. Take two Guardian legs – it doesn’t particularly matter which pair or even if they are a matching pair or not. Make cuts behind the knee pad and in the back heel, and cut triangular wedges from the back of the knee and the front of the ankle, as shown by the red lines.
Step 10 – After you’ve made those cuts the leg can be gently bent into the required crouching pose but don’t glue it together in it’s new pose yet! It’s much easier to do this once the legs are on the bike – for now just make the bends so that the legs are almost “springy”.
Step 11 – Glue the feet only to the foot rests and let this dry.
Step 12 – Once the feet are stuck solid, apply a small dab of superglue to the inside thigh and each of the triangular cuts you made in the legs, then bend them as required so that the pilot is sitting crouched in the seat. Doing it this way makes it much easier to fit the legs to the bike.
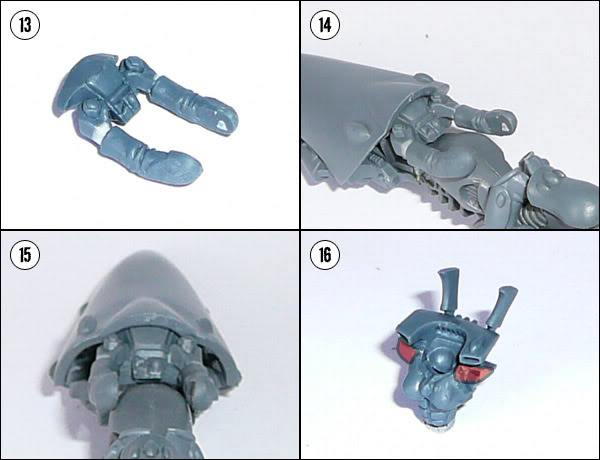
Step 13 – You need to make some minor modifications to the arms – cut and file down the shoulders to remove the impression of shoulder pads, and gently apply some inward pressure in order to narrow the gap between the arms so that they fit better into the sockets of the torso (see the white stress marks at the wrist in the photo).
Step 14/15 – You may or may not have to trim down the console as well, but this depends on your build so far, so test fit the console to your bike. The aim is for the console to fit snugly under the canopy so that the control sticks are just sticking out from under the canopy as shown in the photos. Once you have a good fit stick the arms down. Two of the jetbikes I’m building in this session required the console trimming both on the top and underneath in order to fit, while one fit perfectly with no trimming at all.
Step 16 – Assemble the torso as normal with the sensor vanes, then trim the shoulder pads from the front. This is so that the arms can fit into the sockets without being impeded by the downward curve of the shoulder pad. It’s difficult to see the extent of the trim required in the naked photo so I’ve added a red shaded area to illustrate.
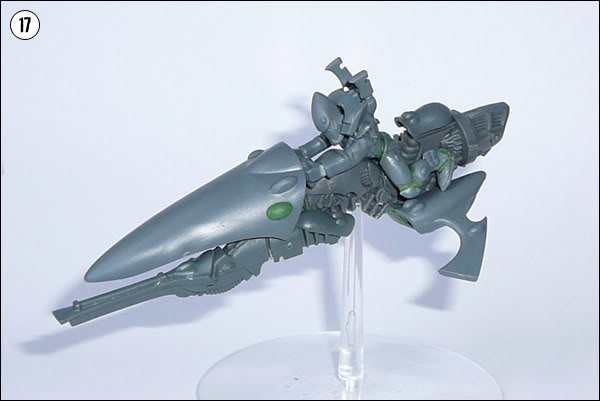
Step 17 – Finally stick the torso in place then use green stuff to fill all the little gaps that will be in the Guardians legs, waist and backside. I found that trimming away the belt enabled me to get a smoother more natural looking transition between the legs and waist here (done subsequent to this photo being taken).
Step 18 – Make some more!
