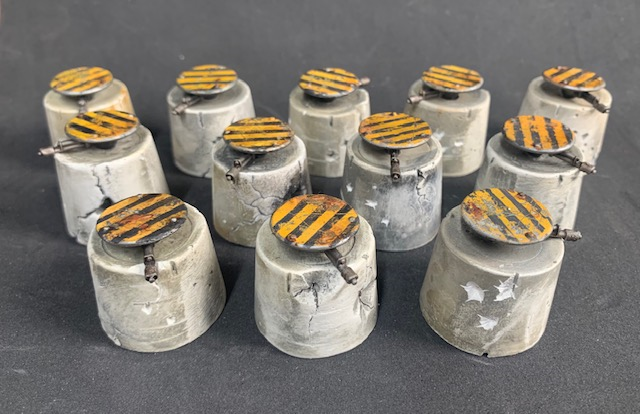
Along with “Death Race” and “Saturday Night Live”, I would say that “Arena of Death” is one of the three quintessential original Gaslands scenarios. In it, players engage each other in car combat while trying to avoid being shot to bits by automated gun turrets (or alternatively while also destroying said turrets). However, despite getting into Gaslands when it launched over 2 years ago, this is a scenario I have NEVER PLAYED due to a lack of actual gun turrets. In the last week or so, I decided to rectify that, and built these:
Gaslands is well known as a thrifty game, and these turrets continue that theme. Each one costs mere pennies and if you don’t have the materials you need to hand, all of them will be useful in other projects down the line. They’re also quick – all told, these took just a few hours of actual work plus drying time. It’s easily possible to crank them out over a weekend if you need to.

Materials
For the concrete turret mounts you will need:
- Some small plastic measuring cups or an ice cube tray with suitably shaped compartments
- Mold release spray, petroleum jelly or vaseline
- Plaster of paris
- Black and ochre craft paint or acrylic
In all my time making terrain I’ve learnt that for making concrete structures in miniature scale there is no better way than casting them from plaster. Plaster has exactly the sort of striations, colour variations, air bubbles and small surface imperfections that poured concrete has. Furthermore, it takes paint wonderfully and can be physically chipped, scratched, cracked and otherwise damaged in much the same way that concrete, with very convincing results. About the only down side is the lengthy time it takes standard plaster of paris to cure enough that it can be handled without excessive care – if you are bothered about this, then I’m sure it’s possible to buy another type of plaster that gets stronger quicker (dental plaster might be something to look into, though I haven’t used it myself).
For the gun turrets you will need:
- 12 small plastic discs about the size of a penny – I used cheap board game counters, but you could also use buttons or they could be punched out of plasticard, or 20-25mm bases would also work well.
- 12 guns. As I started this project I had intended to scratch build these very simply using a block of sprue for the body of the gun and two diameters of plasticard tube, however I happened to find exactly 12 crew fired lasguns from Imperial Guard Chimera’s in a box just as I started clearing the man cave to start on the turrets. This is a rare stroke of luck, as normally it would be sods law that I’d come across these bits after finishing the turrets, so I leapt on the opportunity to use them. If you don’t have these, then the tutorial can easily be modified to whatever you do have to hand.
- Something to make rivits from – I recommend 1mm half round nail art beads, as you can get hundreds of them for a pittance and they are the simplest solution, but if I didn’t have these to hand I’d simply slice them from a length of plasticard rod.
- Wire, toothpicks or plastic rod for pinning the turrets to the concrete mounts.
- Primer and suitable model paints and varnish, ideally some chipping fluid as well though chips can be painted by hand as well.
Step 1 – Prepare the molds
Before mixing any plaster, it’s worth taking a look at your molds to work out how full you want to fill them with plaster to make your turret bases – for Gaslands, things need to be small so a full pour might not be appropriate (apologies if this is obvious, but coming principally from 40k I am constantly having to remind myself of the importance of scale to make things look convincing next to hot wheels cars!). If you want to pour to below the lip of the mold, then it might be useful to mark a line where you want to pour to.
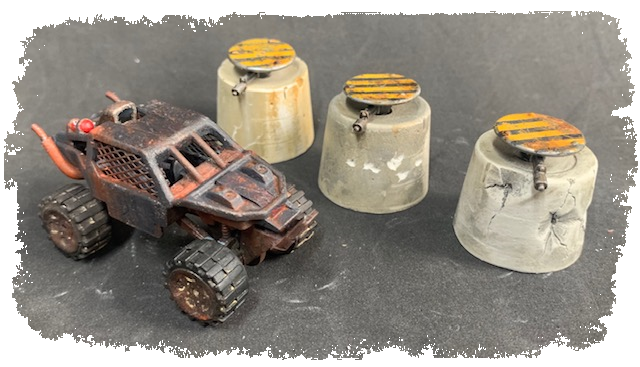
Aesthetically I would have preferred to use a square ice cube mold for my turrets, but ended up using round plastic measuring cups as that is what I could find at short notice, however one benefit of these is that they have a scale up the side that would make it easy to pour reasonably consistent sized bases. I decided that the 15ml line looked about right – this makes concrete bases that are about 2cm high (at the time I thought was big enough to make them look like ramming them would be a questionable decision, but not so big that they’d start to look like Heavyweight obstacles – once I finished the turrets I thought they were actually slightly too big and so if I did them again I’d make the concrete bases more like 10-15mm high). Then apply your mold release agent to the chosen molds – I use silicone release agent spray, which is nice and quick to apply.
Step 2 – Mix plaster & pour
In the cup you’ll use to mix your plaster, mix up a small amount of ochre and black paint then, mixing as you go, add water until you have the amount of water you need to make plaster – follow the directions on your plaster packaging. I colour the water first because it’s infinitely easier than trying to evenly mix paint into a plaster and water mixture. The water should look considerably darker in the pot than the final colour you want your concrete to be (because the plaster will lighten the colour a lot), but when you dab it into a tissue or cloth it should have a consistency no stronger than very dirty water. If you’re unsure, try a test batch of plaster first – the intent is to tint the plaster a bit, however we don’t want to make it too dark because we will also add more paint later – the poured concrete should be lighter than how you want your final turrets to look.
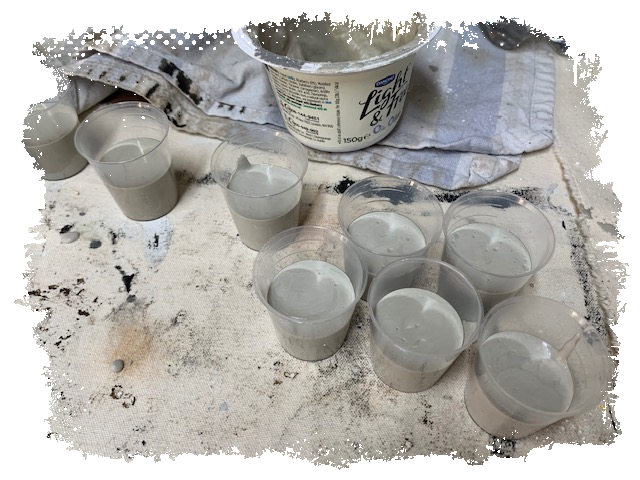
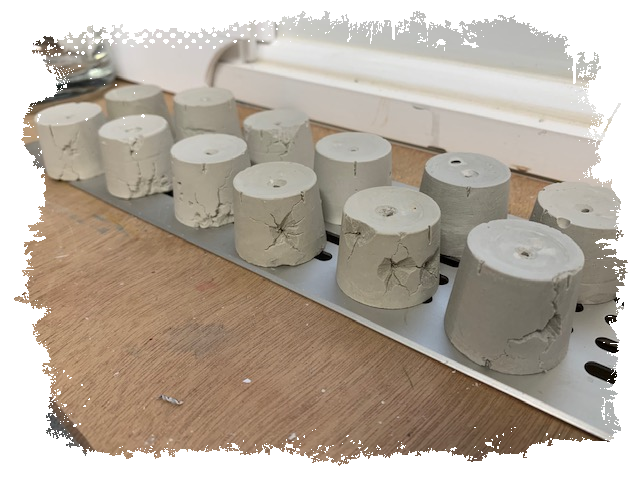
Then, add and mix the plaster to the water, following the directions for your plaster, until you have an easily poured mixture. At this stage you have to work fast and quickly pour it into your molds up to the desired level, as it tends to rapidly go off and very quickly becomes unpourable. Any plaster that suffers this fate can be left to dry in the pot then removed later and broken up into rubble pieces for other terrain use. Give the molds a good tap on the workbench to level out the surface as much as possible, then set them aside to let the plaster cure somewhat.
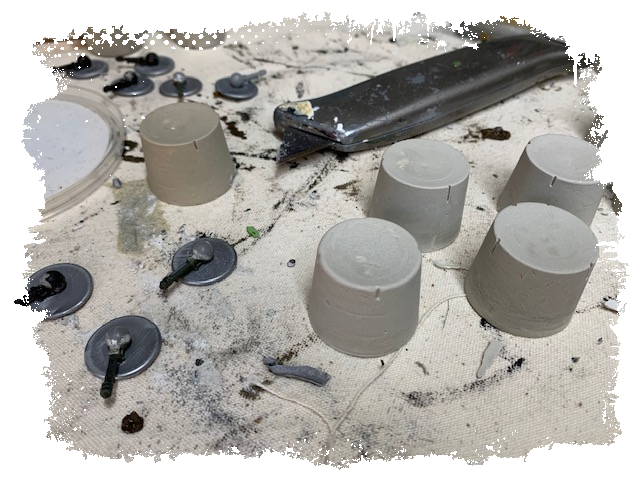
After about half an hour I removed the turret bases from the molds. The plaster is nowhere near fully cured yet but I had the idea that they would cure faster outside the pots, plus some of the work I’ll do is better done while the plaster is still soft (once fully cured, it will become brittle).
Step 3: Assemble machine gun turrets
Your process will probably differ here as you may not have 12 Chimera lasguns to hand or be using the same sort of plastic discs, but the general gist will be the same. I first filed the tops of the lasguns flat and roughly sanded my plastic game counters so they would be better at receiving glue and paint (I was suspicious that they were made of cheap plastic), then glued the lasguns to the discs so that the ball shaped base of the gun was aligned with the center of the disc.

A bonus for using these counters is that they are already a gunmetal colour, so if paint chips off then it’ll just reveal the meta colour. Next add some simple rivit detail to the top of the disc. Here, I used half round nail art beads and after some trial and error decided that having 3 looked best. I drew a set of guides on paper that enabled me to consistently position the beads more or less equidistantly around the disc.
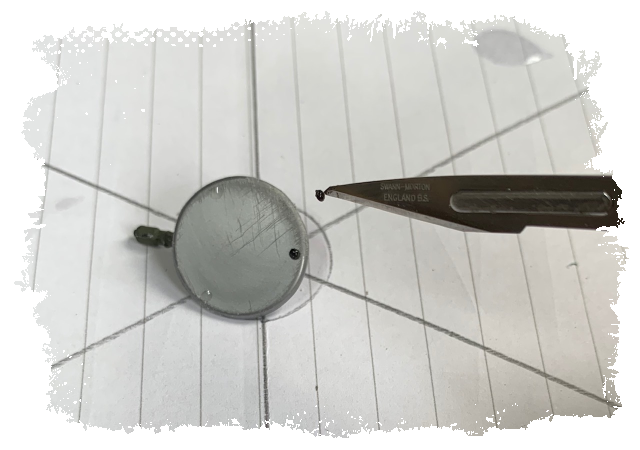
To apply the beads, pick them up by poking them with a sharp knife and then dab them into super glue before sticking them to the disc.
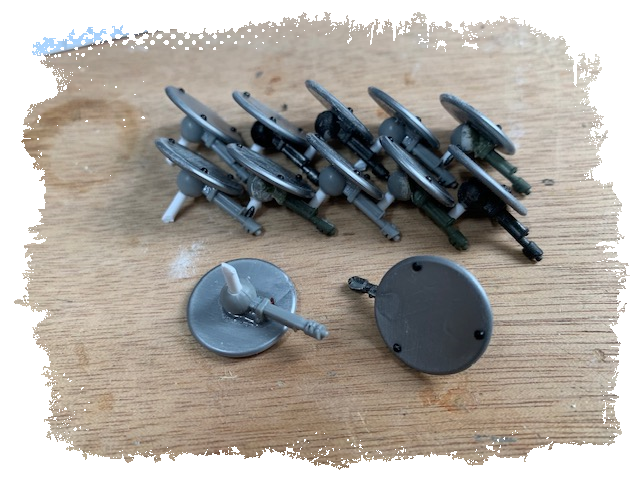
Finally I drilled a 2mm hole in the bottom of the ball joint of the lasguns, and glued in a length of plastic rod – this is for attaching the guns to the bases.

While the drill was out and the plaster was still quite pliable, I carefully drilled a very shallow 6mm indent in the centre of the top of each turret base to receive the ball shape of my lasguns, and a 2mm hole inside this indent to receive the plasticard pin.
Step 4: Paint machine gun turrets
I applied a coat of surface primer to the machine gun turrets (not the concrete bases, I hasted to add). Again, I was concerned about the quality of the plastic I used for the discs, so I made sure to use the good stuff here (Vallejo surface primer) and give it a proper amount of drying time.
When dry I painted the guns with a metallic base coat, darkened significantly with black paint for the underside of the gun shield which will obviously be in shadow and since it isn’t terribly well detailed I don’t want to draw too much attention to what it looks like! I then varnished the top of the gun shields and added a layer of chipping medium to them. Once dry, I painted the top of the gun shield in yellow, masked off hazard stripes with thin masking tape, and stippled black over this.
When that was dry I rubbed off the paint using a damp cloth – the chipping medium causes the paint to come away in a realistic way. I also scratch the paint off in places with a knife, to simulate gouges and scratches. Then, washes of dark brown and rust coloured pigments are used to weather the turrets, and a final brush of metallic paint to highlight the edges and raised detail, before varnishing with gloss varnish to seal and matte varnish for finish.
Step 5: Pre-weathering concrete battle damage
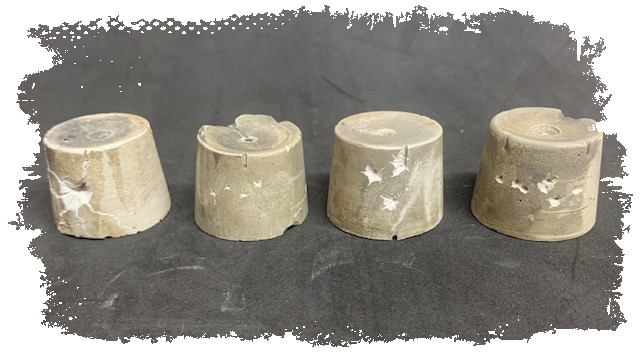
When it comes to applying damage (cracks, bullet holes and blown out sections) to the concrete bases there are two distinct types – damage you create now, before weathering the turret bases with paint, will obviously be weathered at the same time and so it will appear old, very old in fact because the damage bits of plaster will receive paint much more readily than the surface of the plaster. Damage you apply after weathering the bases will be very new as it will reveal the pure, light concrete colour beneath the weathered surface. Depending on your assessment of the working life of a turret in a typical Gaslands arena you may decide that old battle damage that has had time to become weathered is quite rare, if not non existent, so you may want to skip this step. But for my purposes I wanted both types, so here I used my scalpel to drill and gouge bullet holes and gently carve cracks in about 8 of the 12 turrets.
The effect of particularly brutal bullet strikes can be made by gouging a wide shallow hole with starburst striations, then a smaller hole inside this bigger hole where the actual round has embedded into the concrete. All of this is easiest done when the plaster is still soft.
Step 6: Weathering the concrete
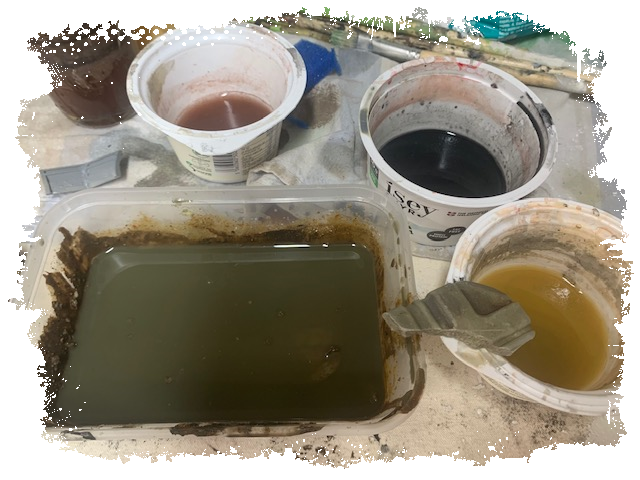
Here we return once again to what is essentially dirty water – the filthier the better and I often use old brush water from terrain projects which contains plenty of black, green and brown paint wash off and even sand and other basing materials. It’s useful to have 2 or 3 different tones of dirty water so you can vary the effects, and have a cloth at hand to dab off the excess. For me, the key colour that is mostly used is the sort of murky green colour, as an all over dunk, and then the black for more severe shading, with accents of different browns. Below are four mixes plus a test piece of plaster I’ve used to check the strength of the colour before dunking my turrets.
 Now you literally just dunk the concrete bases in the dirty water pot(s), using the cloth to dab off the excess and rub some areas back to the bare concrete colour, particularly around the edges of damaged parts and the corners of the structure, in order to highlight them.

In a few places I use a brush to apply small streaks and patches of different colours, allowing colour to mingle on the surface. Just generally enjoy the chaotic process :).
Step 7: Post-weathering concrete battle damage
Here is where you apply new damage, revealing the virgin concrete below the now dirty surface of the turret bases. Just follow a similar process to step 6.
You may also want to add some explosion and burn markings using black paint applied with a reasonably dry brush.
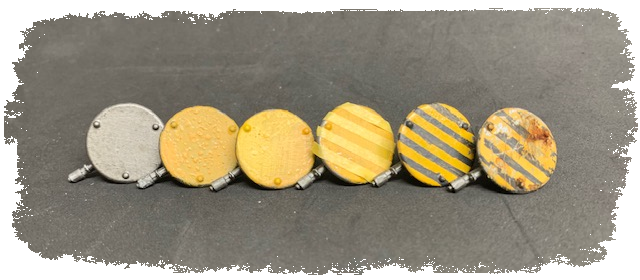
Step 8: Final assembly
Now you just need to glue your machine guns into the concrete bases and you’re done!
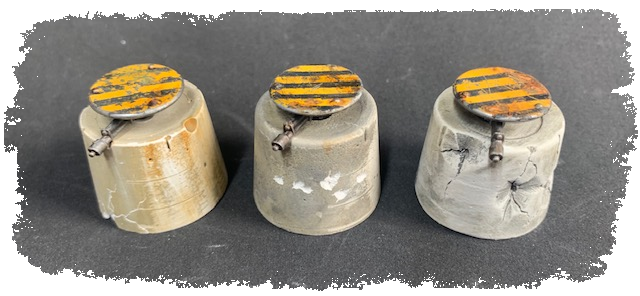
One of my buggies for scale. As I said above, retrospect they are probably a bit big for medium weight destructible obstacles – I’ll see how it goes, but may play mine as heavy weight instead.