During the many months of the build I picked up a couple of old wooden pallets that were lying around in car parks and streets and so on. Much like most terrain builders do when they see a skip full of polystyrene packaging, whenever I saw a pallet I would spend some time eyeing it up to see if the wood was suitably aged and pleasing to the eye!
Breaking these down was WAY harder than I ever imagined and took hours of time – I only had a couple of hammers. A big crowbar would have made the job much easier.
Building the shelves followed a rough plan but mostly I built them organically one by one, cutting and fitting them around the things I knew would go on to the shelves. I used black shelf brackets and angle brackets to screw it all to the walls and to itself as I went. The result is a sturdy, unique looking set of shelves purpose built for the space, with the aged wood contrasting nicely with the dark blue walls.

On the left hand side, the “messy” area, the shelves are dominated by a big set of plastic drawers, normally used for hardware, but here making a readily accessible and well organised bits box (which is steadily being populated from my old bits boxes as the mood takes me). Below this on the front of the shelf I screwed a couple of magnetic tool holders, for storing pliers, sprue clippers, pin vice, drill bits, files, knives etc.. The rest of the shelf space is for bigger boxes of bits that don’t fit in the bits drawers, and catalogued “projects in progress” at the top, plus empty shelves for future use.
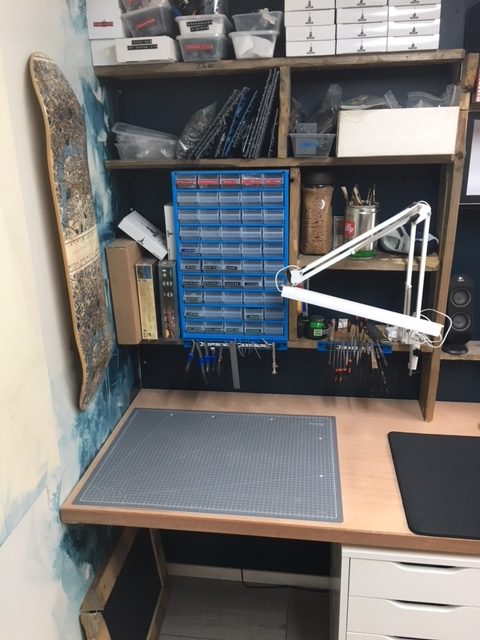
Moving right along the shelves there is an angle poise LED daylight lamp stowed away, which can be pulled out when needed, most likely for detail painting. Bottom right is the monitor shelf. The monitor usually inserts into a large oval base but this was too big to fit on the shelf so here the monitor is fixed in position by milling a hole through the shelf that perfectly matches the base of the stand and inserting the bolt that would normally hold the monitor to the stand from below through a metal brace. This shelf has recesses in the back edge to allow cables to pass, hopefully keeping everything as neat as possible.
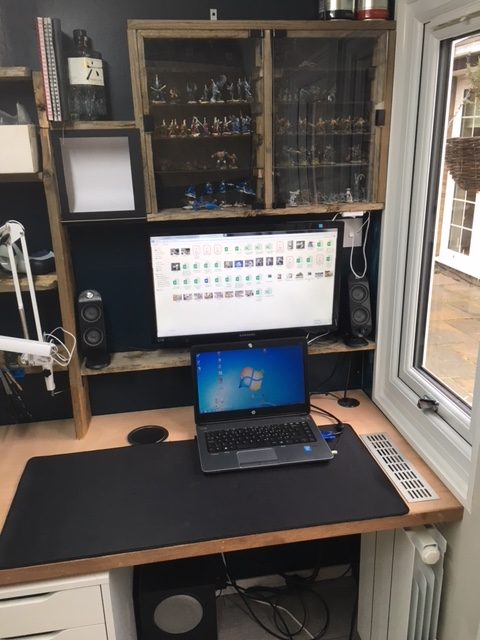
Above this is the miniatures cabinet and a small light box. This hasn’t proved entirely successful, as it’s not deep enough and the light is too blue – so I may remove this in time (or turn it into a second miniatures cabinet) and buy one of those folding LED light boxes instead.
Kim murray
This is FANTASTIC!!!! I will be referring back to this! It’s like what I want to. Build 👏🏾👏🏾👏🏾👏🏾 Well done!
Dan
The finished room looks brilliant!
I am planning something similar for my garden. Thanks for going into such detail about the build.
I think you have used thinner insulation to Ali Dymock, is the garden room warm in winter? I would also like to keep the wall thickness down as my space isn’t that big.
Thanks
Dan
Admin
Cheers Dan. It’s freezing in winter… until you put the radiator on! The small oil filled one I installed really packs a punch and after half an hour it’s very toasty and to answer your question properly the insulation is sufficient to keep it that way for a while. Due to the pandemic either me or my other half works in the shed all day and I’d say 2-3 half hour bursts of the radiator are sufficient to keep it very comfortable all day. If you set up the radiator on low level constant or to maintain a minimum temperature via thermostat then I daresay it would easily avoid wild swings in temperature, if that’s important to you.
Reflecting on the build after having used the shed continually for 3 years, there is almost nothing I’d have changed. Probably the only thing is the cladding, which I didn’t pack close enough (or put another way, I didn’t wait for it to dry properly before installing) and over time it has shrunk leading to unsightly gaps emerging between the panels (which of course will also mean more water is hitting the OSB skin than intended). This means I have an annoying job to do, that I’ve been putting off for years, of removing the cladding and retrofitting a couple of additional panels.