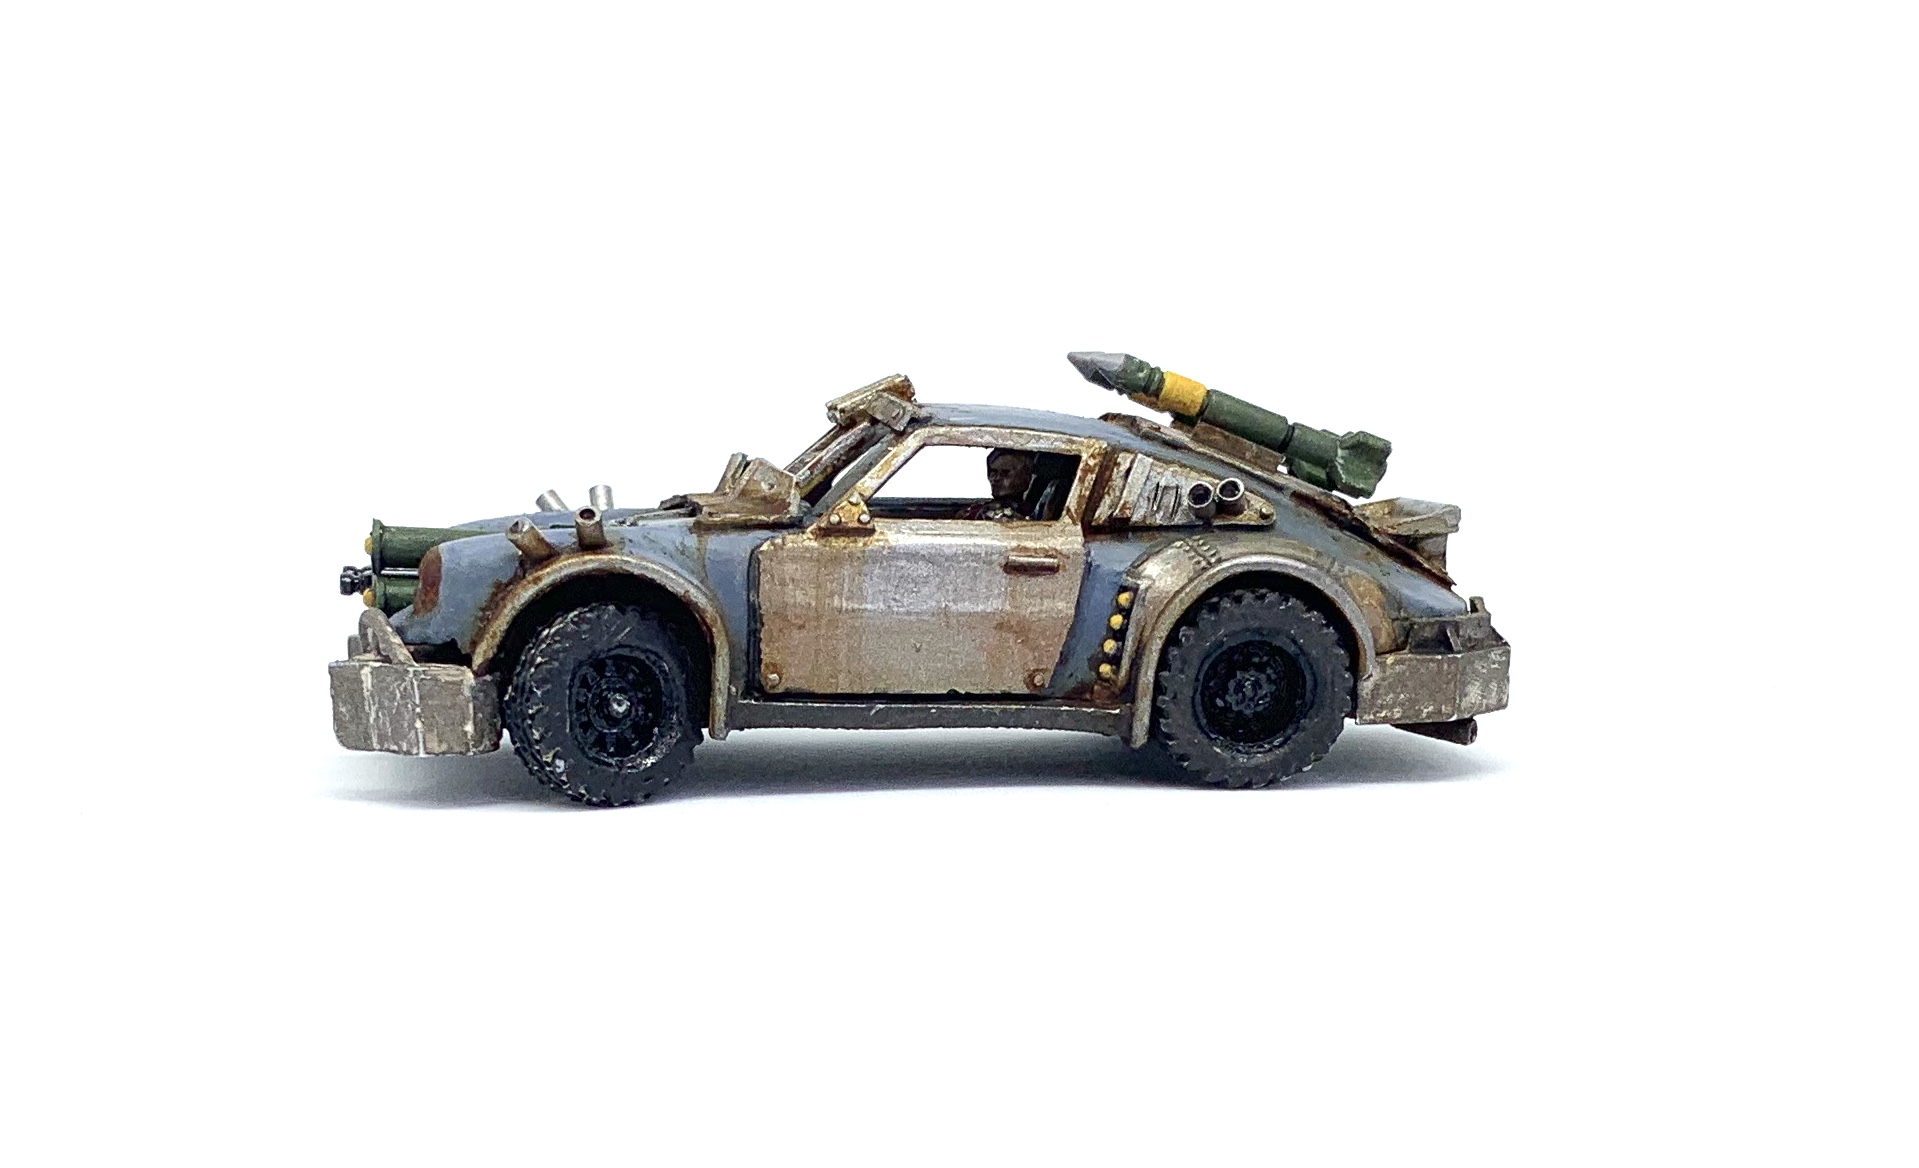
This is a long post with tonnes of photos, documenting my attempt to turn a bog standard Hot Wheels 911 to the most accurate replica of the 911 that 14k drives in the film “Death Race” for a competition run by the Gaslands UK Facebook group. I initially published this on Facebook as a series of 10 updates over the course of a month, but am copying it here for posterity too. This build was so involved that it’s basically an entire project log in it’s own right, albeit one started and finished in 4 weeks.

#1 – Scale Drawings
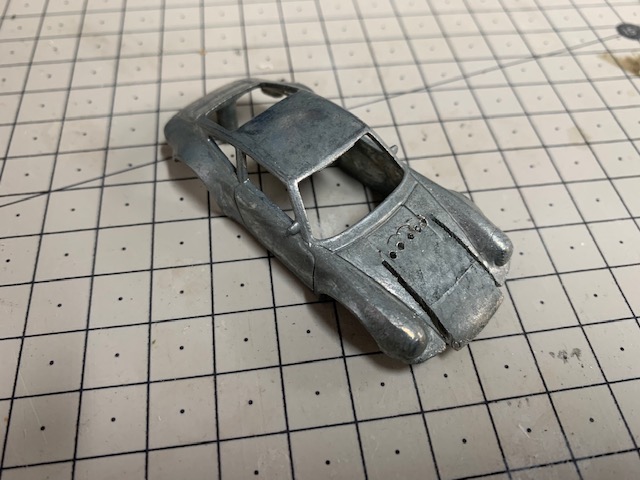
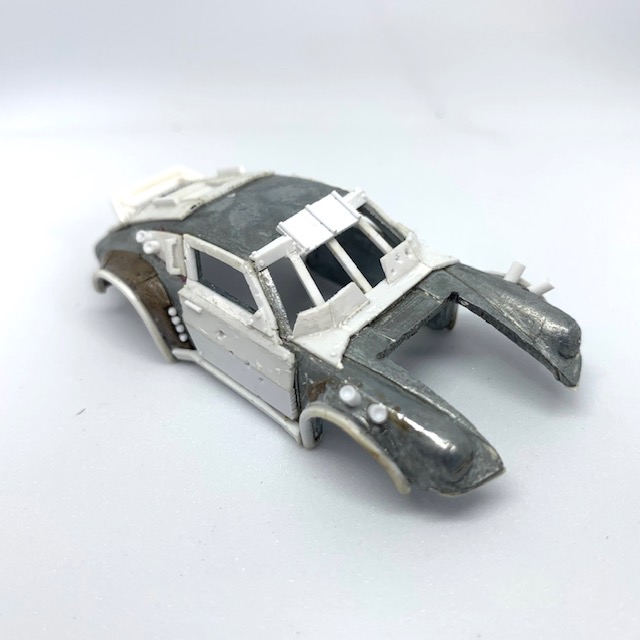
I’m going to try and make the replica as accurate as possible, scale constraints aside, and so after taking the car apart and dropping the body into a jar of paint stripper, I sourced some photos of the actual car used in the film and used these to work out how big various parts should be once scaled down for my Hot Wheels build.
I use Microsoft PowerPoint for anything like this – it has accurate measurements built in and the ability to minutely adjust alignment and size of shapes and images. In this case, I measured the wheel base of the Hot Wheels 911, which is 38mm. I then drew a line to measure the wheel base on the photo, and divided it by 38 to arrive at a 1mm unit on the photo.
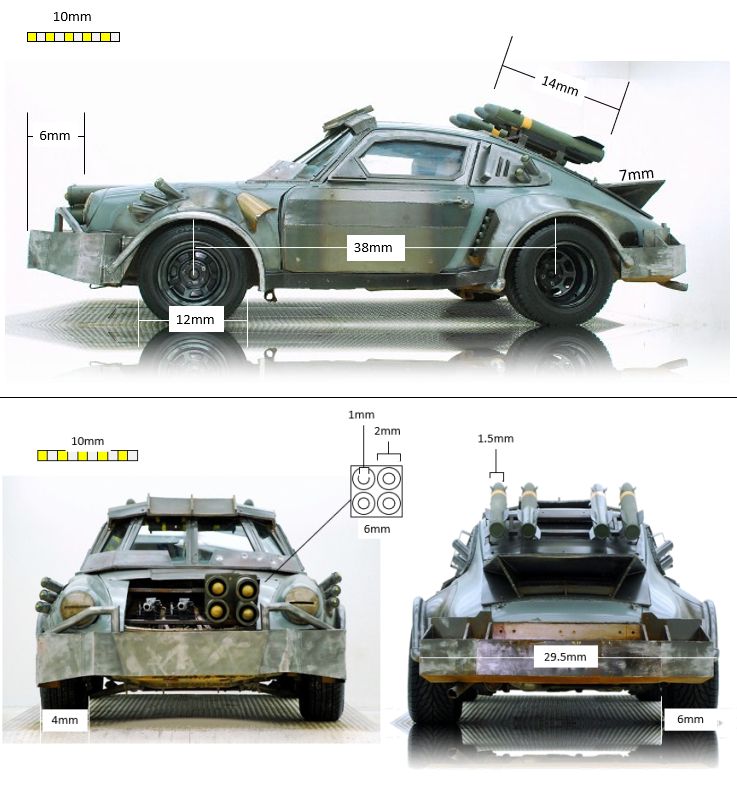
Once you know how long 1mm is on your photo then it’s easy to measure most parts of the car. Try to find photos without too much perspective on them – side, front and rear profiles are what I used. It won’t be perfect but should lead to a more accurate replica than eyeballing everything.
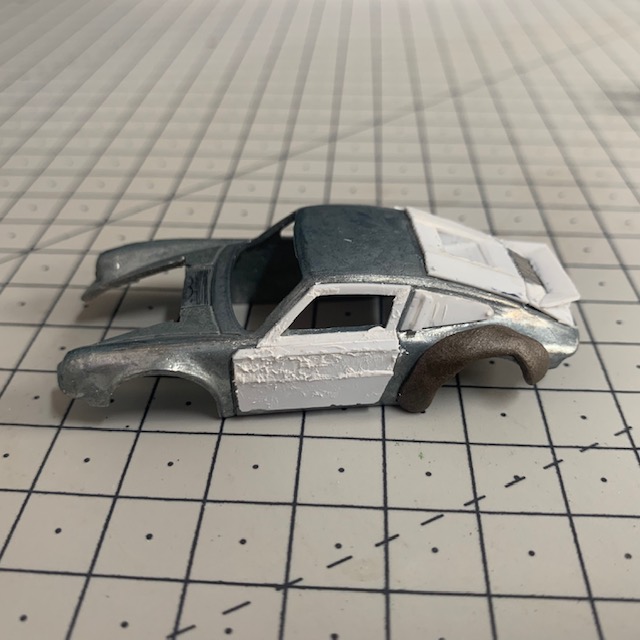
#2 – Weapon Bay
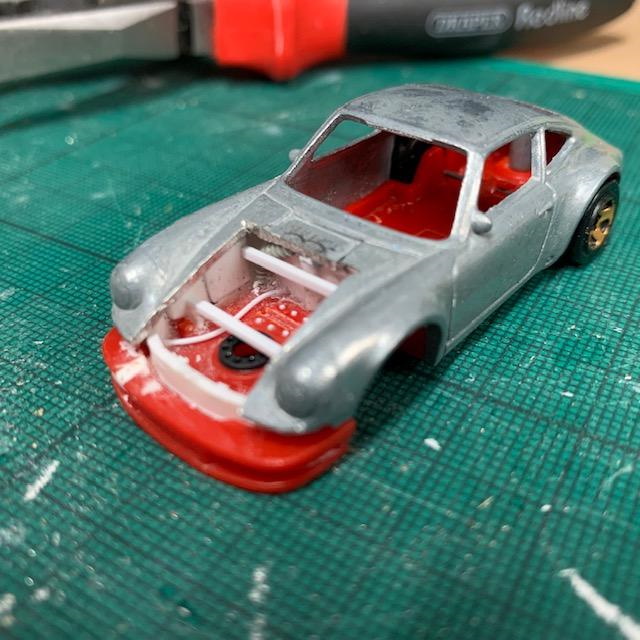
The biggest modification to the car is removing the boot/trunk (remembering that the 911 has it’s boot at the front), so I started with that. I had initially assumed the prototype had just had it’s boot lid removed and planned to follow the edges of the boot with the hacksaw, but studying the photos realised it was actually cut open. I made the side cuts accordingly with a hacksaw then perforated the rear edge with several holes using a tiny drill bit. I could then bend the piece back and forward till it snapped and clean up the edges with some files.
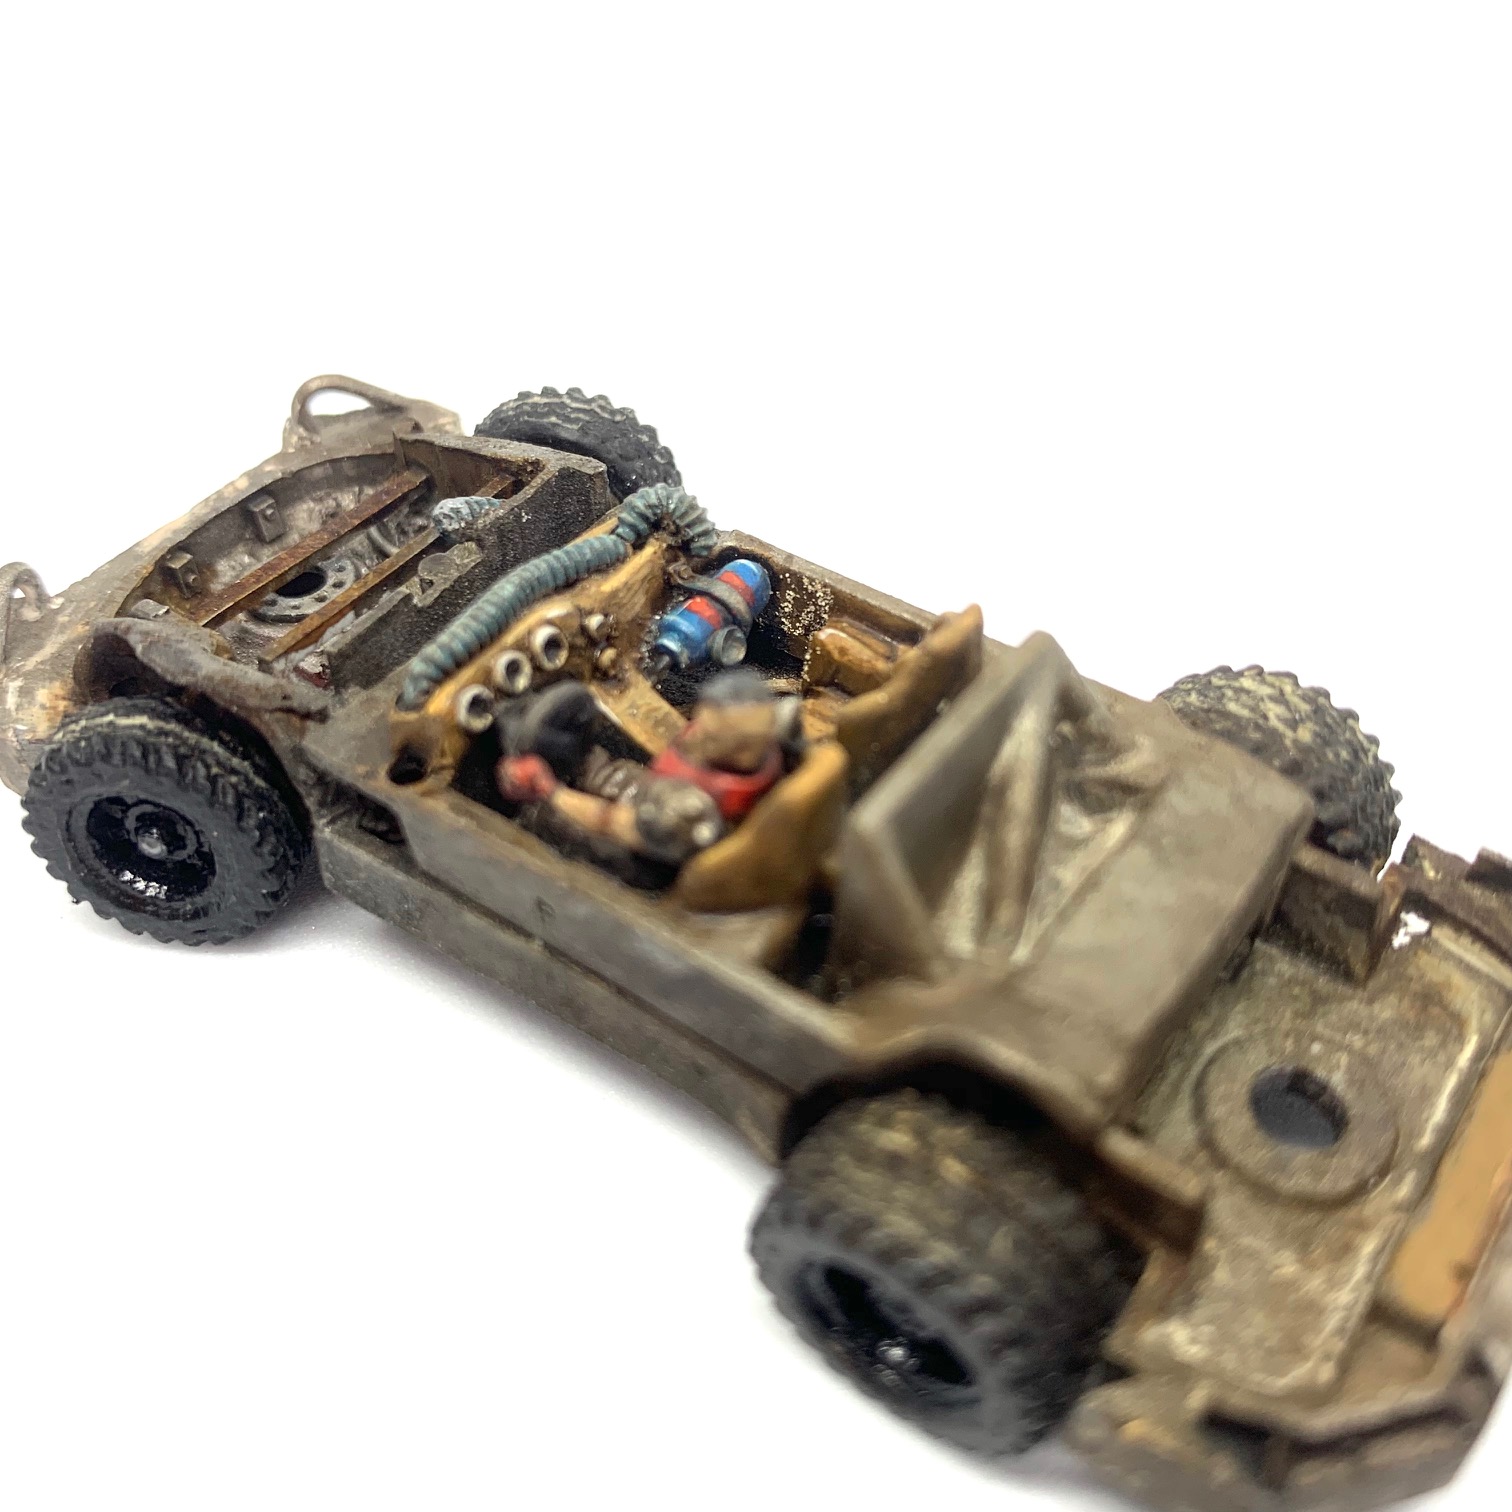
Once the rocket pod and machine guns are installed, you won’t see a great deal of the inside of the boot, or the weapon bay, if you will. Still, I wanted to suggest some forms in there so I used some plasticard to reconstruct the inside of the right wheel well which on the Hot Wheels 911 is too close to the centre line of the car (I didn’t bother doing this on the left wheel bay, as it’ll be completely concealed by the rocket pod), and added a few “greebles”, a cable from 0.5mm plasticard rod and a ribbed hose sculpted from putty using a tube tool.
Lastly the photos show several iron bars welded across the width of the weapon bay, on which the weapons are bolted, so I added these using some plasticard strip.
#3 – Rocket Pod
I scratch built the rocket pod using plasticard 1mm rod (for the rockets) and 2.3 and 3mm tube. It’s the first time I did anything like this, and seems to require quite some patience and dexterity! The 2.3mm tube doesn’t fit inside the 3mm tube, so for each rocket tube, I first rounded off the edge of the 3mm tube, then reamed out the inside with a drill bit so it would accommodate the 2.3mm tube, then cut it to approx 6mm long. I then glued the 2.3mm tube inside that. Another ring of reamed 3mm tube was glued to the front of the rocket tube. Once I had four passable tubes I stuck them together and when dry, filed down the ends of all four tubes flush.
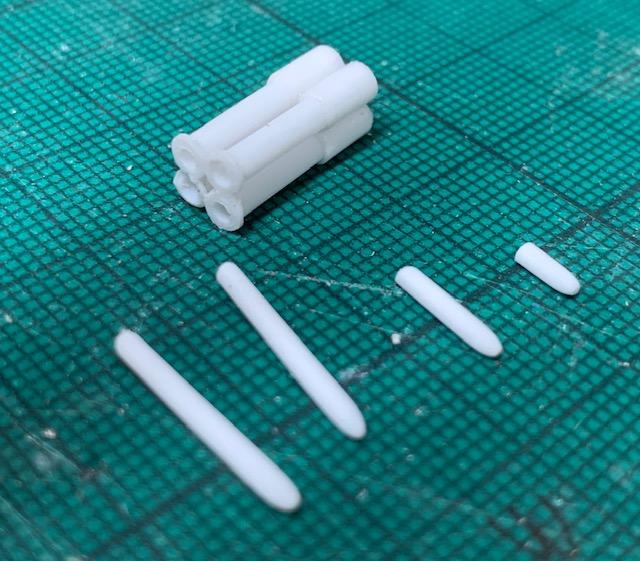
The 1mm rod for the rockets was tapered and rounded off using a fine sanding sponge, spinning the rod between thumb and finger much like a lathe. Once happy I cut the rocket off the rod. Finally these get inserted into the rocket tubes so they are just protruding. 1mm rod fits very snugly inside the 2.3mm tube, but by tapering the end it looks like the rockets have some clearance from the tubes when looking straight on at the pod.
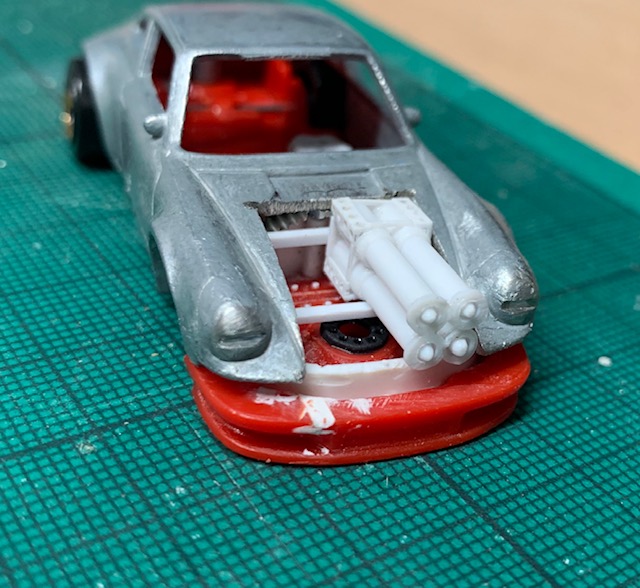
I took some corner profile plasticard (mine is 1.4mm x 1.4mm – a little small but what I had available) and drilled a row of 4 tiny holes, equally spaced, along each side. When cut to length this makes the outer framework at the rear of the pod. Drilling these holes is painful but thankfully only 5 of 8 edges are actually visible and need drilling.
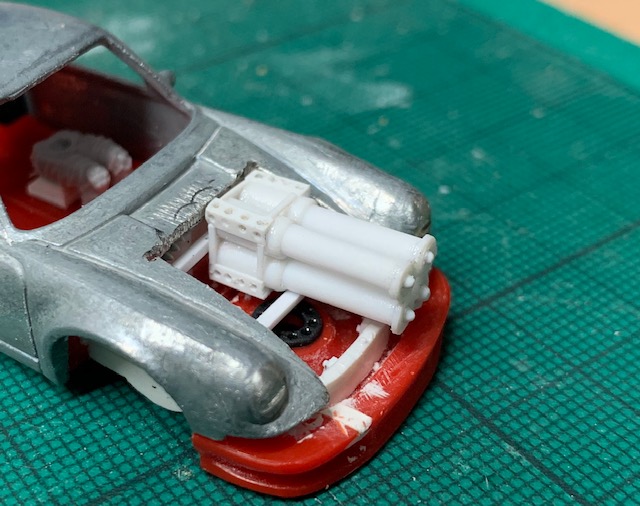
Lastly, a square of plasticard makes the back plate of the pod and some very fine strips were glued between the corner plates as bracing – and it’s ready to be painted.
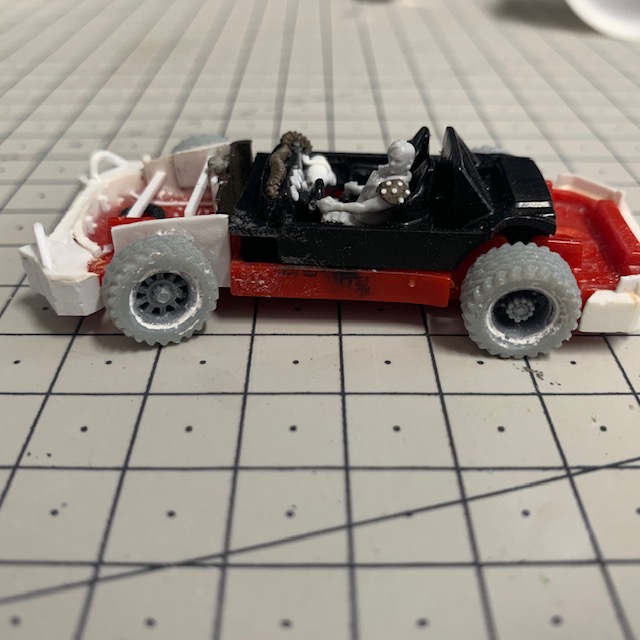
#4 – Cockpit
Without really planning it I ended up working my way from front to back on inner details and so after finishing the rocket pod it was time to detail the cockpit. The model is fairly well detailed as far as Hot Wheels go, with two bucket seats, a steering wheel, gear stick and a hint of dashboard detail. However, the seats are too high (a driver sat down would have his knees in line with the steering wheel and have his neck bent to get under the roof).
The first order of business therefore was to lower the seats by about 4mm or so, which I did by removing the existing material with a file and then sticking a couple of plasticard blocks to the chassis until one of my driver models was sat at the right height. I painted the foot wells and around the seats in black before gluing the inside part of the car in place, as this would be hard to reach properly later and I didn’t want any bright red plastic showing through. Then the drivers legs were stuck in and I sculpted a new seat bottom for the passenger seat.
The driver was then glued in piece by piece to fit well in the cockpit – torso, left arm holding the steering wheel, right arm on the gear stick, then the head looking out of the side window. The left arm fit wasn’t perfect so I sculpted a shoulder pad to cover the join – a small ball of putty, flattened on to the shoulder then some studs sliced from a 0.5mm length of plasticard rod superglued on.
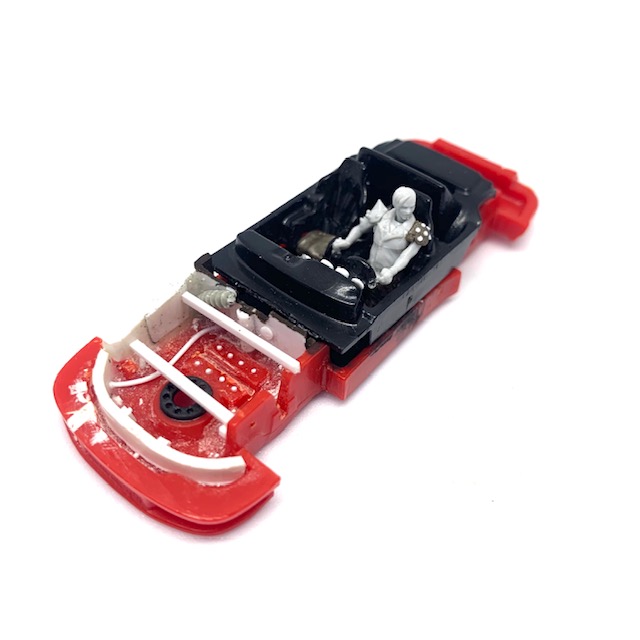
The last thing was to stick some slices of 1.5mm rod as a suggestion of the dials running across the 911’s dashboard.
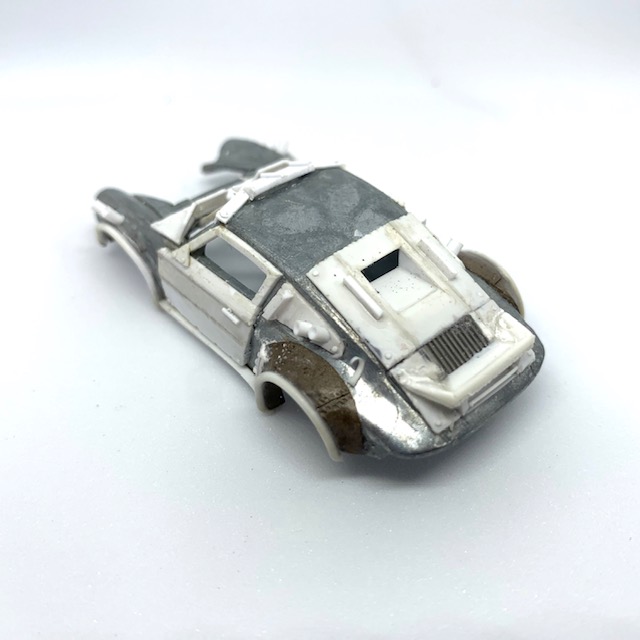
#5 – Rear Armour
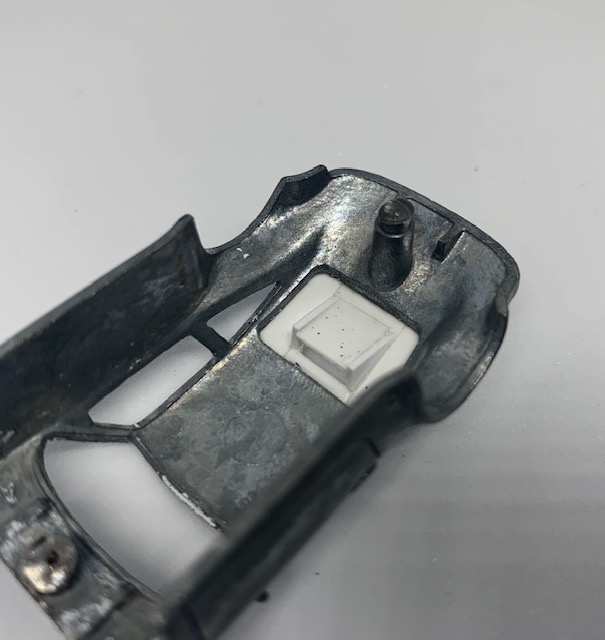
This is mostly scratch built with 0.5mm plasticard/styrene sheet. The prototype is not one monolithic piece of armour plating but in fact made of several separate sheets welded together, allowing the final plate to sit over the subtle contours of the rear end of the 911. This job just requires careful measuring and straight cutting, and offering up the panels to the model as you go to refine the fit. The ends of the panels have been gently notched many times with a sharp scalpel to simulate rough cut steel. The panels are then superglued one by one on to the car body and each other.
I had clocked there was a window port in the rear armour panels but had assumed it to be a simple flat one – on looking more closely at the photos of the prototype, it was an unpleasant surprise to discover the port is in fact recessed quite deeply into the armour panel. This meant I had to build the recessed structure inside the window slot as well (see below). I can later slide a piece of clear plastic into the back of this from the inside, once the model is painted.
With that job out of the way I continued down the armour panels, building the vectors one by one and adding a fine vent piece from my bits box as a nod to the vent above the rear “spoiler” on the prototype. Another horizontal vent below the spoiler is made by abutting 3 “L” profile styrene strips together.
Speaking of the spoiler – it’s not steeply angled enough nor does it protrude as much as the one on the protoype – a slip of concentration and something that is guaranteed to annoy me for ever more. However, by the time I realised this my feeling was it was too late. All the pieces are delicate and well glued with super glue and polycement to smooth the joins between parts, and I was worried if I started tearing them up I’d do more damage than good to the underlying armour panels.
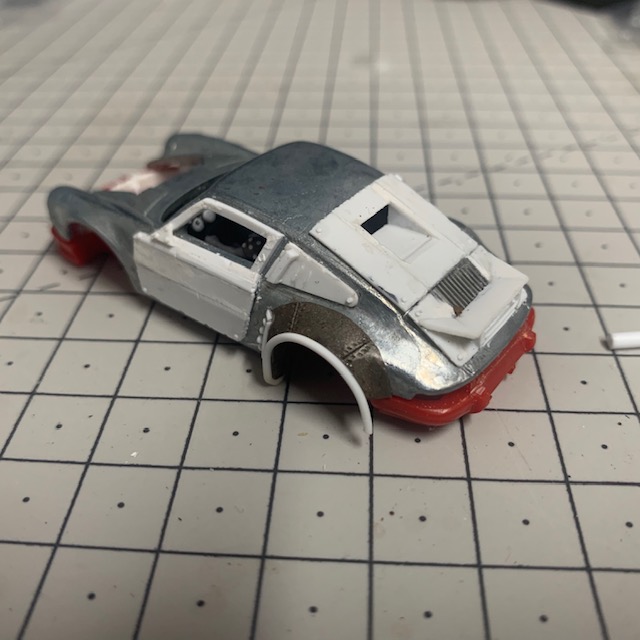
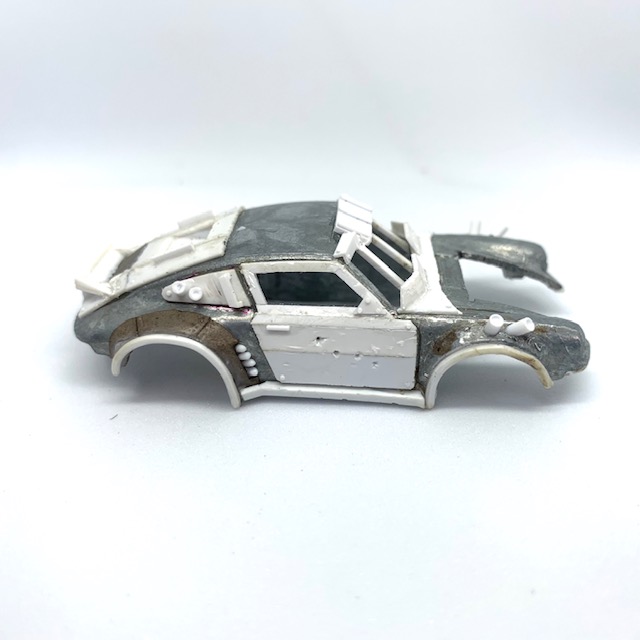
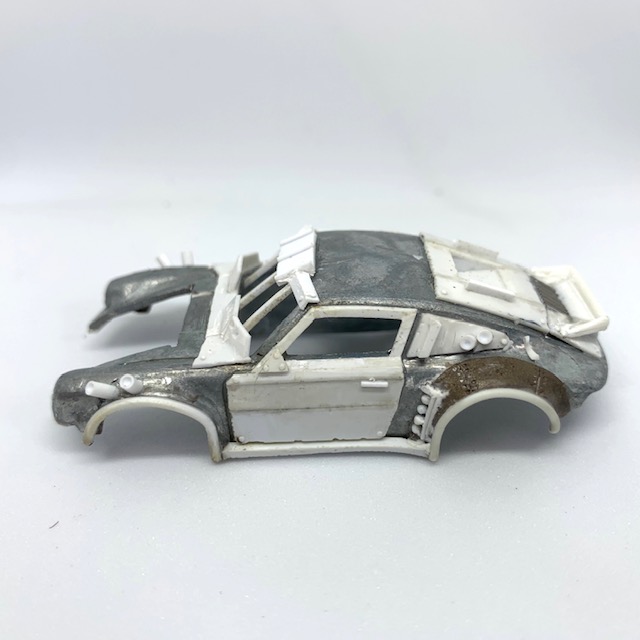
#6 – Side Armour
Moving around to the side, the plating over the door, around the front side windows and covering the small rear windows was all built in much the same way as the rear armour, using individual styrene shapes cut to fit and glued on one by one. Details such as the “handle” that is welded to the back side window armour plating are also made from styrene, in this case an I beam profile filed down to a ] shape. This photo also shows the use of plastic putty to fill gaps – here roughly applied and it will later be filed and sanded smooth.
More interesting here is the first step in building the flared wheel arch armour. The 911 has quite heavily flared wheel arches anyway, but the prototype death race vehicle has additional panels over the top that make them even more prominent, AND a sort of ram bar welded around the edge of the wheel arch to protect the bodywork during side collisions. I use brown/silver epoxy sculpting putty, which dries harder and less pliable than the more commonly used (among hobbyists) “green stuff” – allowing it to be sanded and cut with more precision. In this photo I have rolled a sausage of putty and “smooshed” it onto the wheel arch.
I then took a flat clay shaper – a specialist sculpting tool that has a flexible but firm silicone head – and used this to smooth down the majority of the panels, pulling the putty out over the edge of the existing wheel arch. As I went I neatened up the edge with a sharp scalpel to remove excess putty and with the flat edge of the clay shaper to get as neat a line as possible. I then moved to a round clay shaper to impart some of the curved “flair” to the panels. I ended up alternating between flat and round shapers for some time, refining the shape and polishing the surface, and removing excess with a knife.
When the shape is right I made the final cuts in the putty – removing a rectangular section where on the prototype there is a mini missile launcher embedded in the arch, cleaning up the inside edges one final time and scoring panel lines. I also lightly pressed in rivet detail using a very small drill bit. I’ve slightly neatened up the outside edge of the arch, mostly by pulling the putty under the arch into the wheel well and roughly flattening the edge, but I can do this part of the work properly once the putty is dry and didn’t want to risk misshaping the panels by fiddling too much with the edge.
Once the putty is dry I used files and a knife to flatten and trim the outside edge back to the profile of the wheel arch. Overall with the putty I had gained approx 1mm of width to the wheel arch. On top of this goes another 1mm via the ram bar, which is made from plasticard rod. I heated this and wrapped it around a pen while it cooled to give it a smooth curve, then glued it to the outer edge of the wheel arch. More 1mm rod, rounded at the tip, was used to make the mini missiles and I finished off this launcher with a tiny bead of 0.5mm styrene around the launcher opening in the wheel arch.
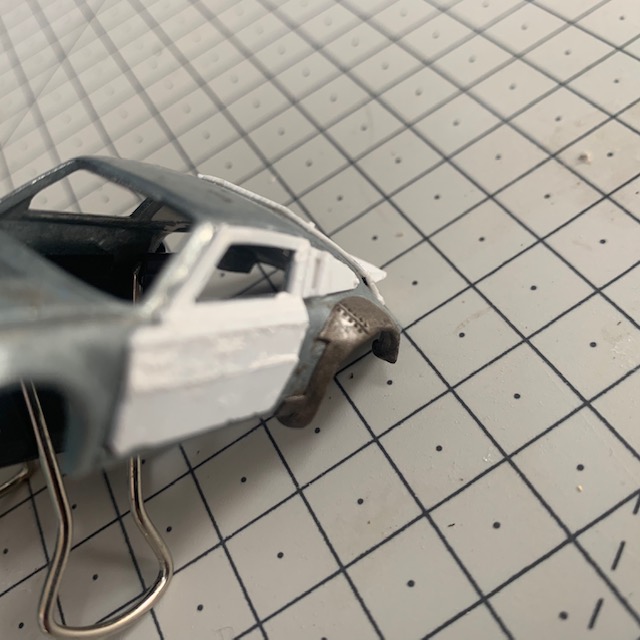
#7 – Rear Reinforced Bumper
According to the measurements taken from the photo the reinforced bumper would need to be 2x4mm in profile. I don’t have any plasticard of this size so I started by making a blank from two strips of 1mm plasticard, cut slightly bigger than 4mm. Once sandwiched together with polycement, I carefully sanded the two pieces back to 4mm and flush with each other. The prototype bumper shows a lot of scuffs, dents and scratches, so I roughly added these to the blank with various files.
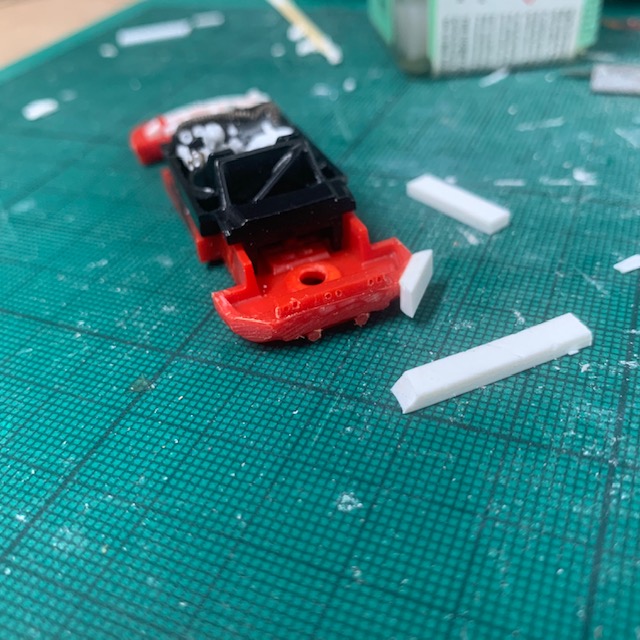
The prototype has an exposed area of rusty or primered bodywork below where the number/license plate would go. On the Hot Wheels 911 this area had a bit of extra bumper detail, so I shaved this off to leave a flat area where the plate would go, and drilled small holes where the bolt holes are on the prototype. Then I faceted the bumper so it has flat angled edges to easily mount the reinforced bumper.
From there it was a simple matter of cutting lengths of my 2x4mm blank, checking them against the model and gluing them in place once the measurements and angles were right. As with other parts of the model, I don’t try and cut all the parts to size first, as that would surely lead to poorly fitting pieces. Once the bulk of the reinforced bumper was complete the extra pieces of shielding that are welded on top were made from tiny rectangles and triangles of 0.5mm plasticard.
I am leaving the top of the 911 removable from the base, both for painting and so I can look at the inside detail more easily once complete. With the bumper there is a crucial mating point between the top and bottom of the vehicle, where the ram bar around the wheel arch joins to the bumper structure. To make this look convincing, I left the ram bar long and then cut it back once I knew where the bumper would come to, so that it is flush with the bumper with no discernible gap once the two halves are together.
Lastly I used a 1mm rod with a hole drilled in the end, stuck into a hole in the chassis, for the 911’s exhaust.
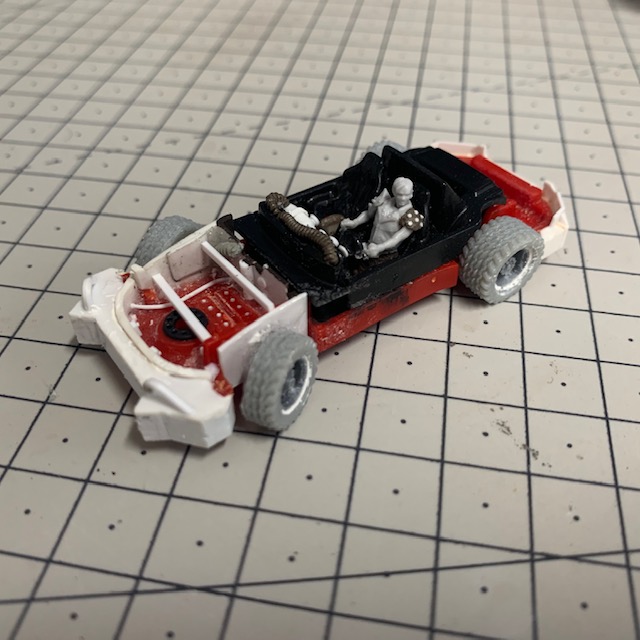
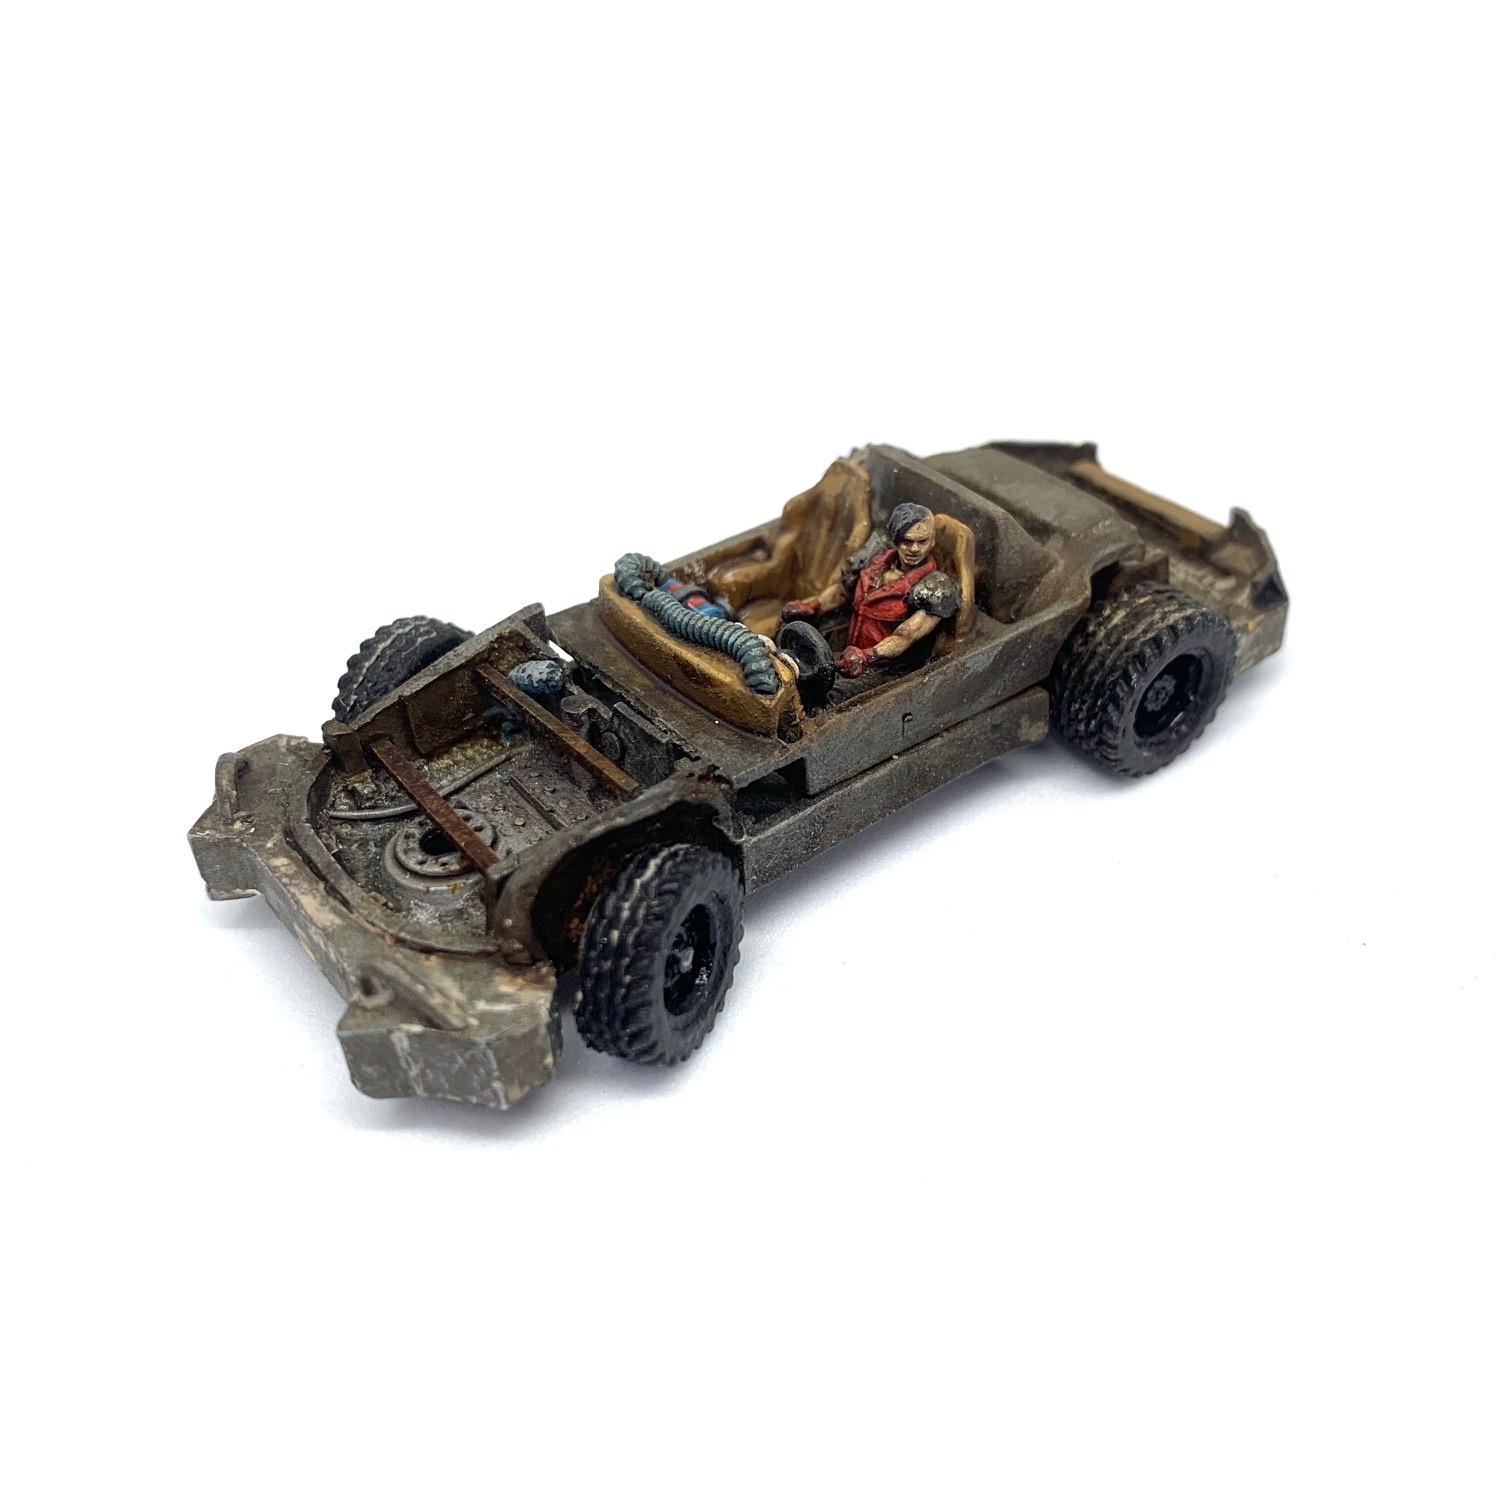
#8 – Finishing the Chassis
As with most Hot Wheels the 911 comes with quite poor wheels, and in this case they were slightly too small (11mm, where my scale drawings suggested 12mm would match the car in the film). I ordered 12mm wheels from Kyamsil Designs. All their normal tyres are 6mm wide – this was perfect for the rear wheels of the Porsche which have particularly fat tyre, and I used a deep set wheel hub to emphasise this tyre width and match the car in the film as closely as possible.
I trimmed and sanded the front tyres down to 4mm wide, and used a different spoked hub, again to match the film car. I set the front wheel hubs back from the outside tyre wall, and rounded off the inside edges of all the tyre walls, filling any gaps between hubs and wheels with plastic putty. This sort of detail will barely be noticeable, but to show off the excellent detail of the Kyamsil tyres and hopefully demonstrate better the work put into matching the tyre thicknesses of the 911 I tried something I’ve not done before and glued the wheels on mid-turn (they’re pointed in the same direction that the driver is looking).
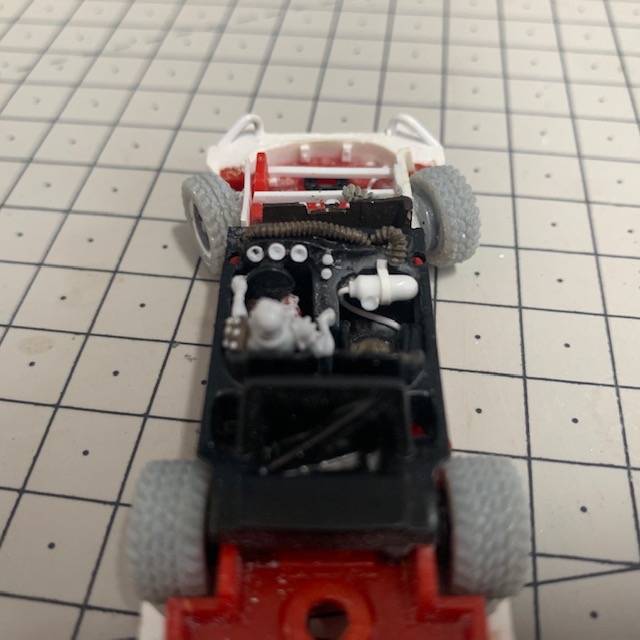
Also pictured here is a close up of the interior, which since update #2 has had extra work after I studied the photos of the prototype a bit more closely.
- A bottle of NOS mounted under the passenger dash made in my usual way from 2mm rod rounded off, a 1mm cap, and a hose from 0.5mm rod, with an added tap from 2 diameters of rod
- I drilled out a shallow indent in the dials that I’d added to the dash, to give them some form
- I used a tube tool to roll some ventilation hose from epoxy putty, which runs along the top of the dashboard.
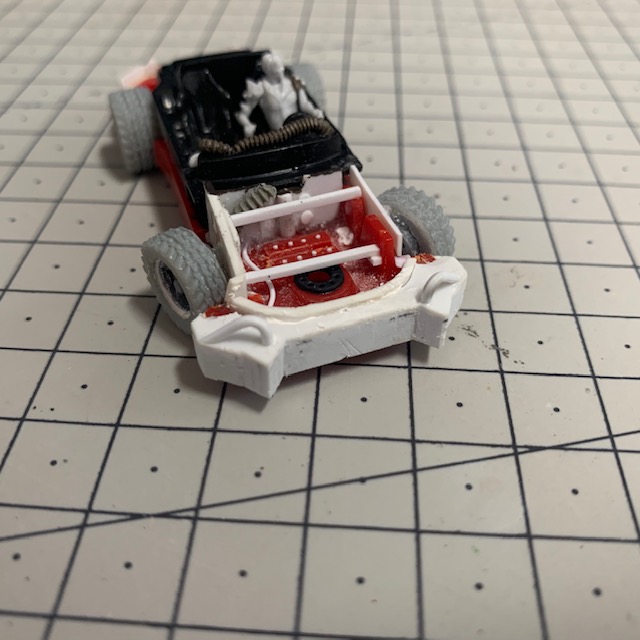
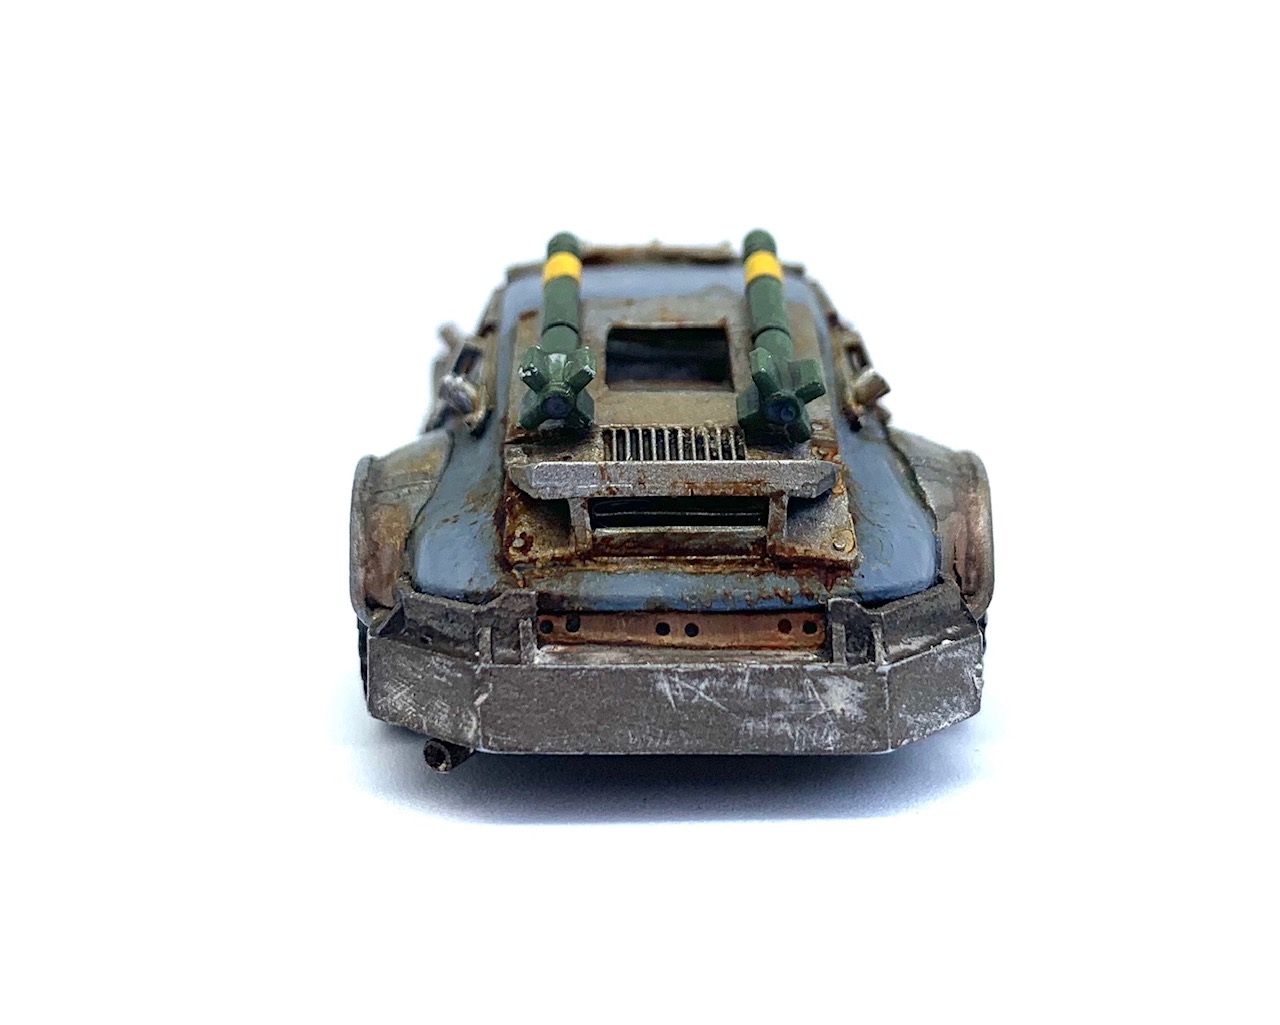
I made the front bumper in much the same way as the rear – with a blank made from cementing together several strips (three 5 x 0.7mm wide strips this time) which was cut and fit around a filed down original bumper. This was only slightly more complicated by the “horns” on the front of the bumper.
With this all done I will give it one last check against the prototype photos to see if there is anything else I’ve missed, and then I can progress to painting the chassis and interior while I carry on working on building the armour plates of the car body.
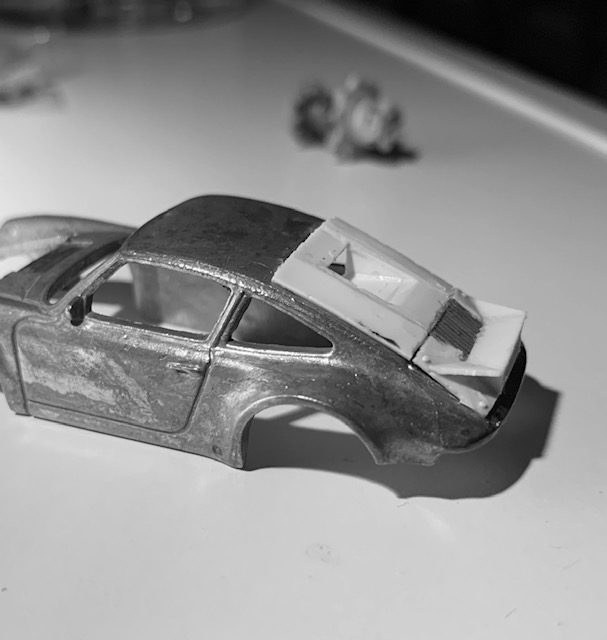
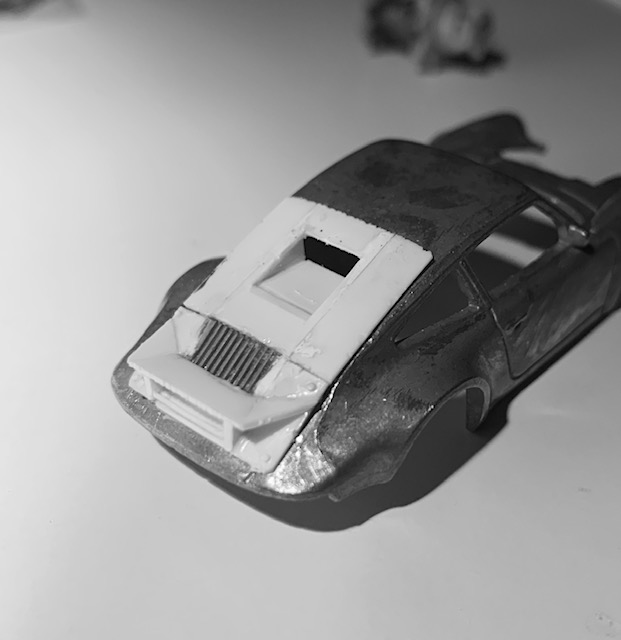
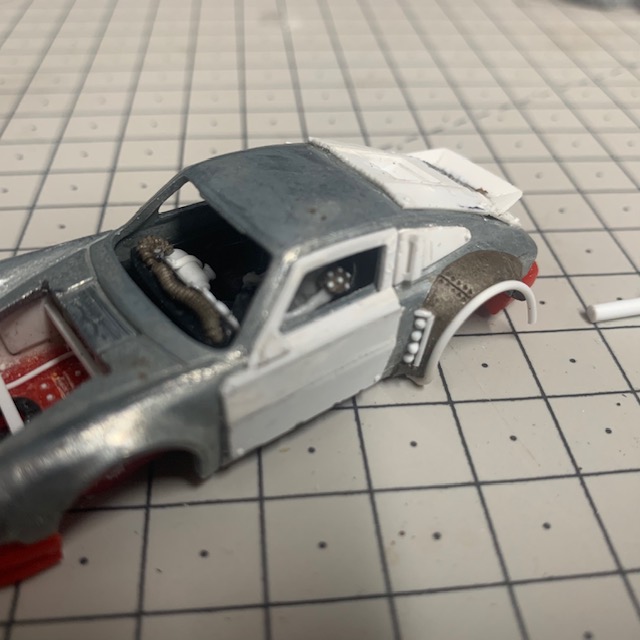
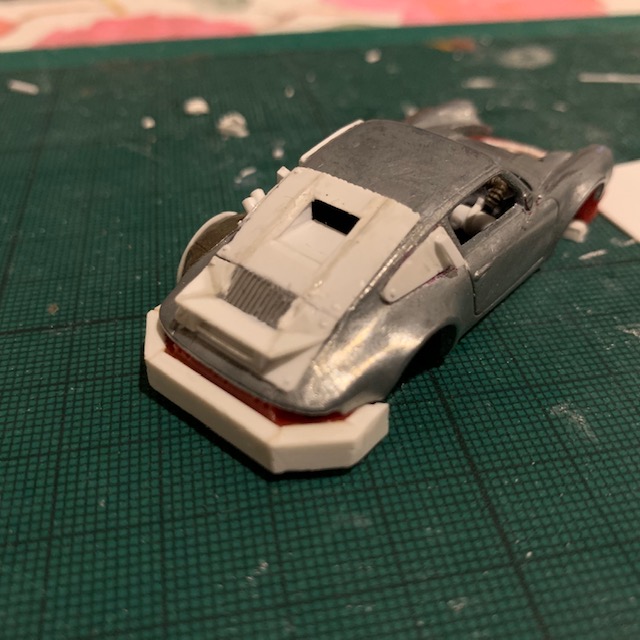
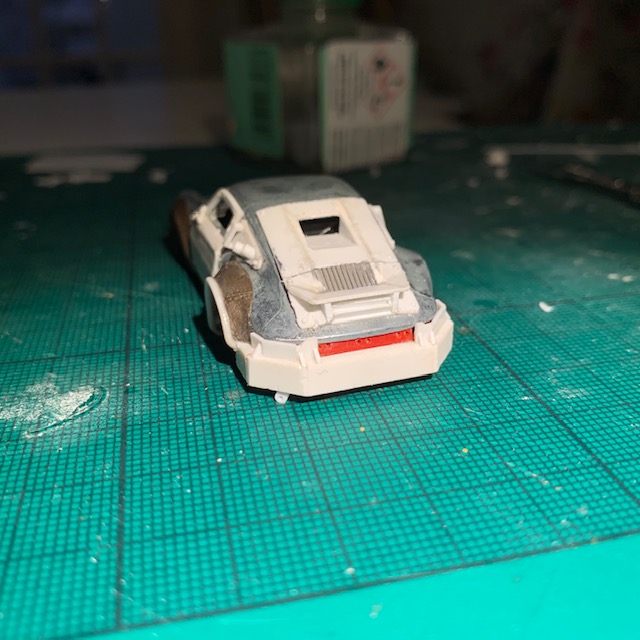
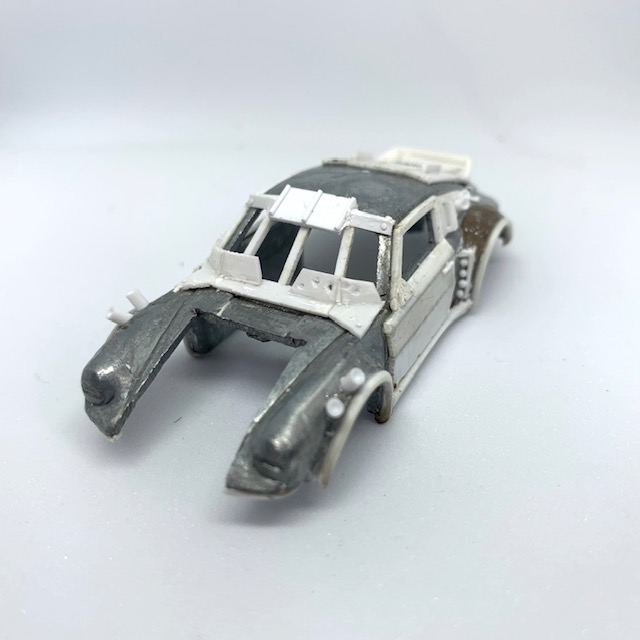
#9 – Windscreen Armour & Details
The windscreen armour is elaborate but there is not a lot to be said about how it’s built that I haven’t said already about other parts of the armour plating – just taking my time to cut and glue each individual facet in place, checking the fit, size and angle several times for each piece before adding glue. The vertical struts across the windscreen mean I cannot use the transparent window that comes with the car (which as it happens I managed to lose anyway) so I’ll need to cut and stick in some pieces of transparent plastic once the car is painted.
I’ve mentioned before that the spoiler I made is not prominent or angled enough and after a couple of weeks it bothered me so much that I added a bead of quarter round plasticard strip around the edge. Once dry I trimmed this back to slope the sides. This gave the whole spoiler a bit more presence and a profile more like the prototype.
The rear missiles I’m using already had a mount moulded on, but it was aligned with the fins instead of being offset from them, so I cut the mounts off the missiles and added some to the car ready to receive the missiles (which will be painted separately).
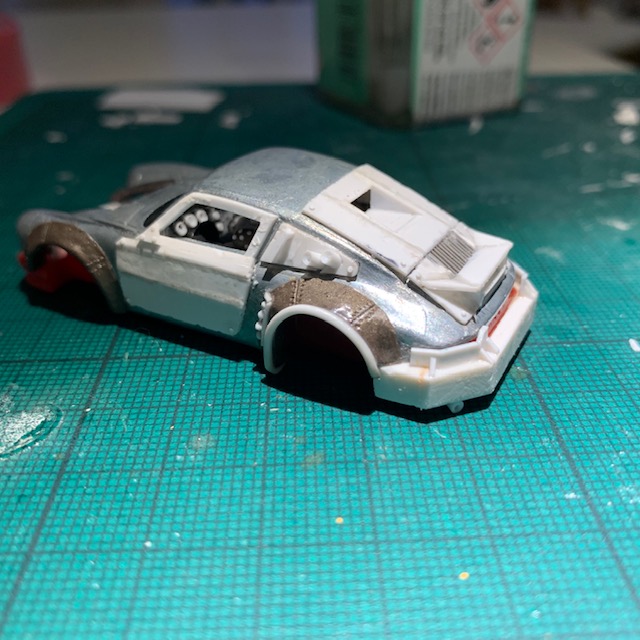
Bolt or rivit heads sliced from 0.5mm plasticard rod were glued in place at various points on the doors, front and rear armour, more or less following the locations of these on the car in the film. The same rod was used to suggest door handles.
To make the mini missiles mounted in the rear fender launchers, I rounded the tip of a 0.5mm rod with a fine sanding sponge then cut the missiles off at an angle to be glued on to the car body. Each launcher has four of these little missiles, a detail so tiny on the model that I was initially sceptical about copying it at all.
At one stage I had sculpted additional armour panels on the front fenders/wheel arches as well, but the additional width this gave the front looked all wrong and I cut away the putty a couple of days later. I did add the ram bar around the edge, and some smoke launcher tubes by drilling holes in the car and inserting plasticard rod that I then snipped and cut to size before drilling in to the ends to make them look like tubes. I also used a hacksaw to cut horizontal slots in the headlights – the car in the film has a metal shield over the lights with a narrow slot.
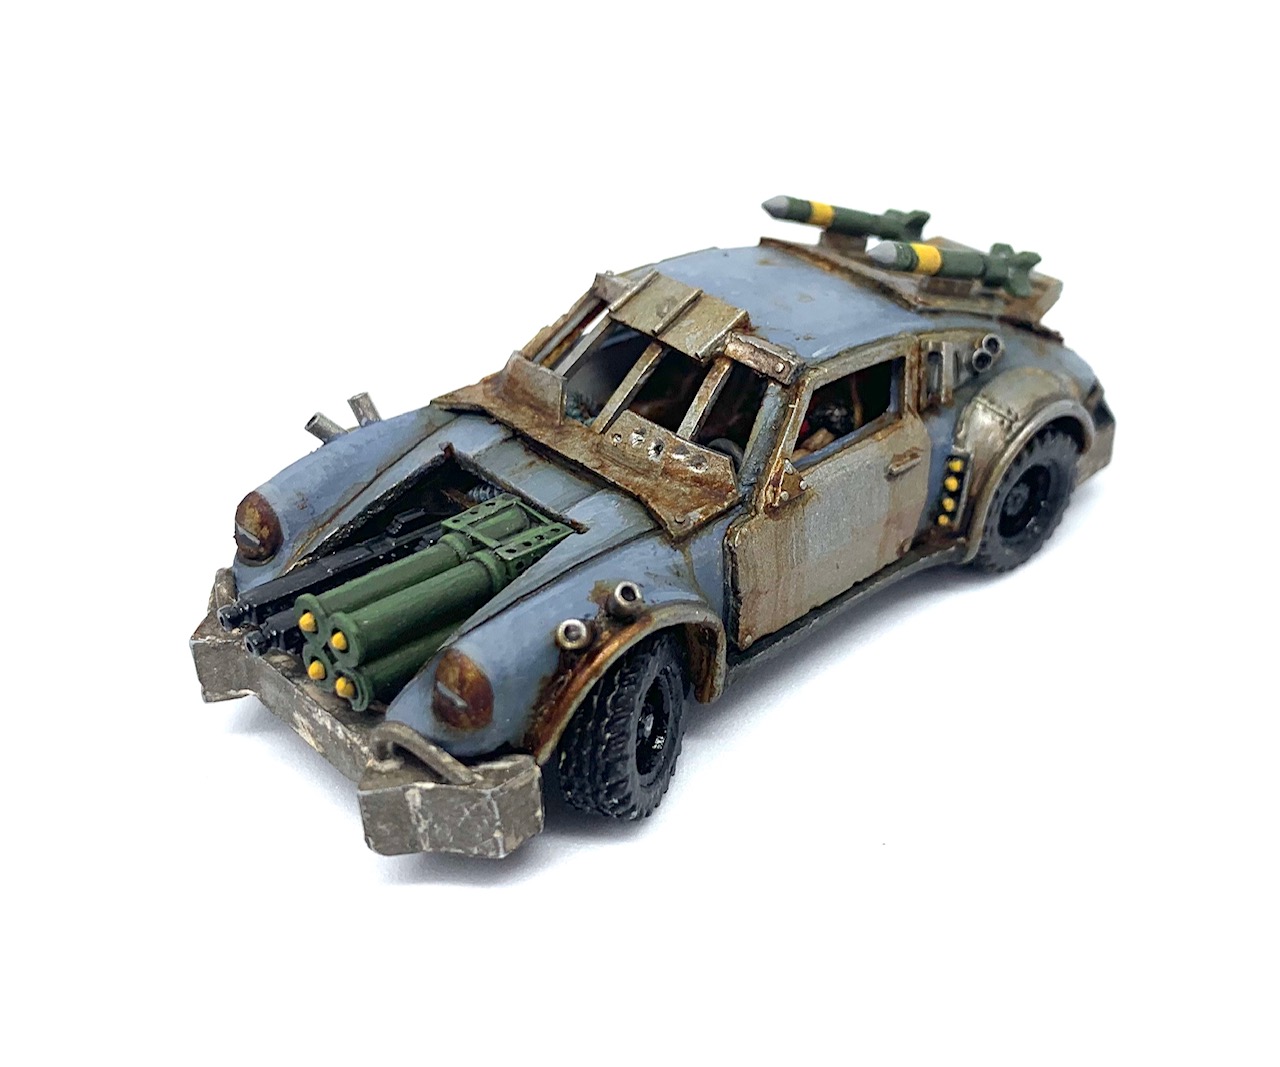
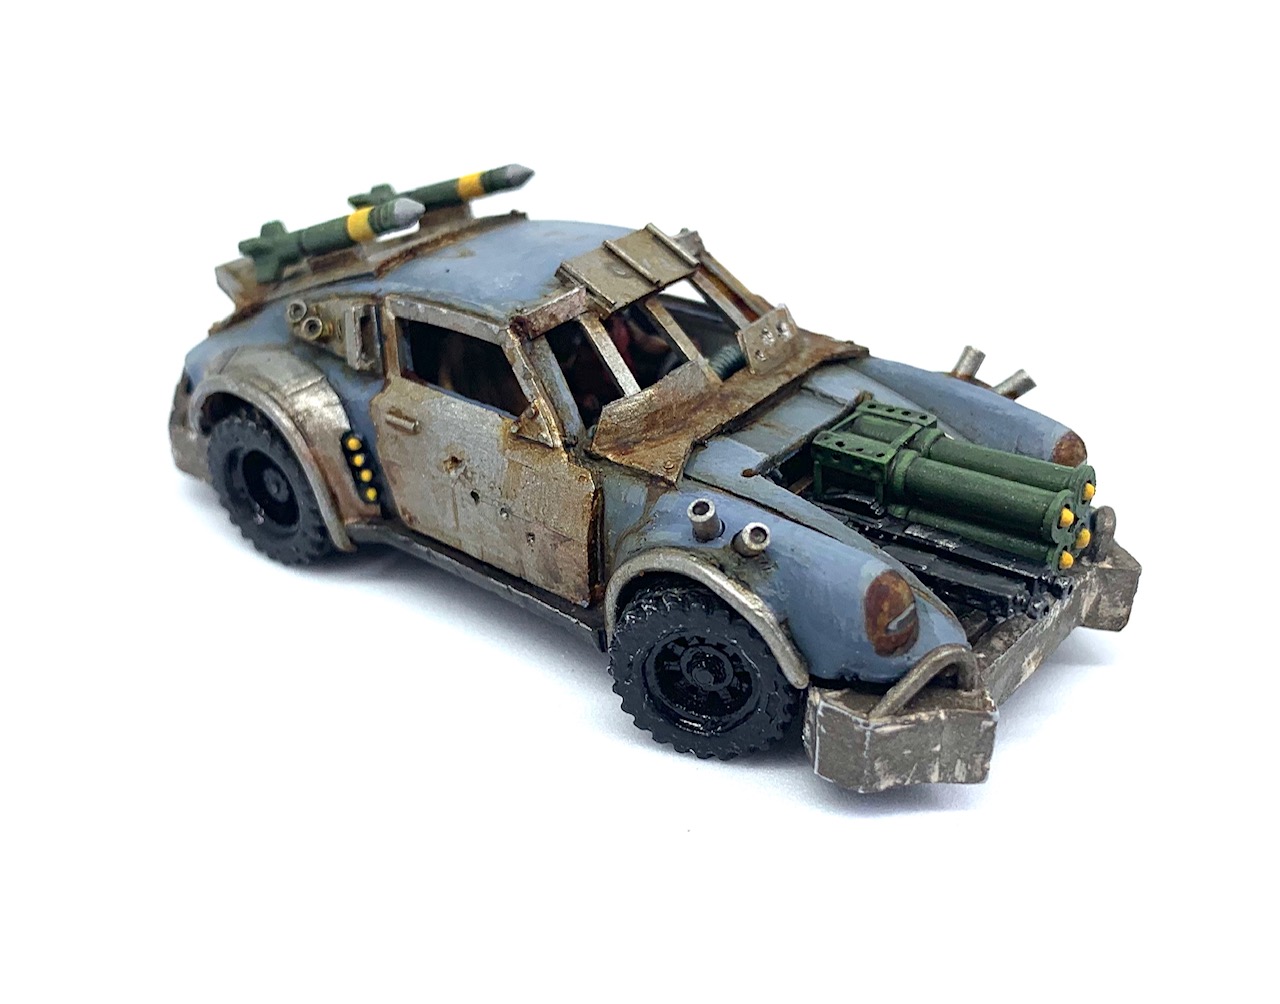
#10 – Painting
I used some artistic license and went for a darker blue than the prototype and a lot more rust to give it more of a Gaslands feel. The technique employed here was some simple base coats then thin layers of shade and glazes. I used orange and red glazes on the metallic armour plates to vary the colour tones of the metal particularly where two faces meet, to emphasise the faceted nature of the armour. I used thin washes of dark and light blue grey and applied these as glazes to emphasise the shape of the body. Then I went to town with the rust – the secret weapon here is model mates rust effect, which is basically like painting actual rust onto the model, and is semi permanent so if you put too much on, you can remove it again with a damp brush.
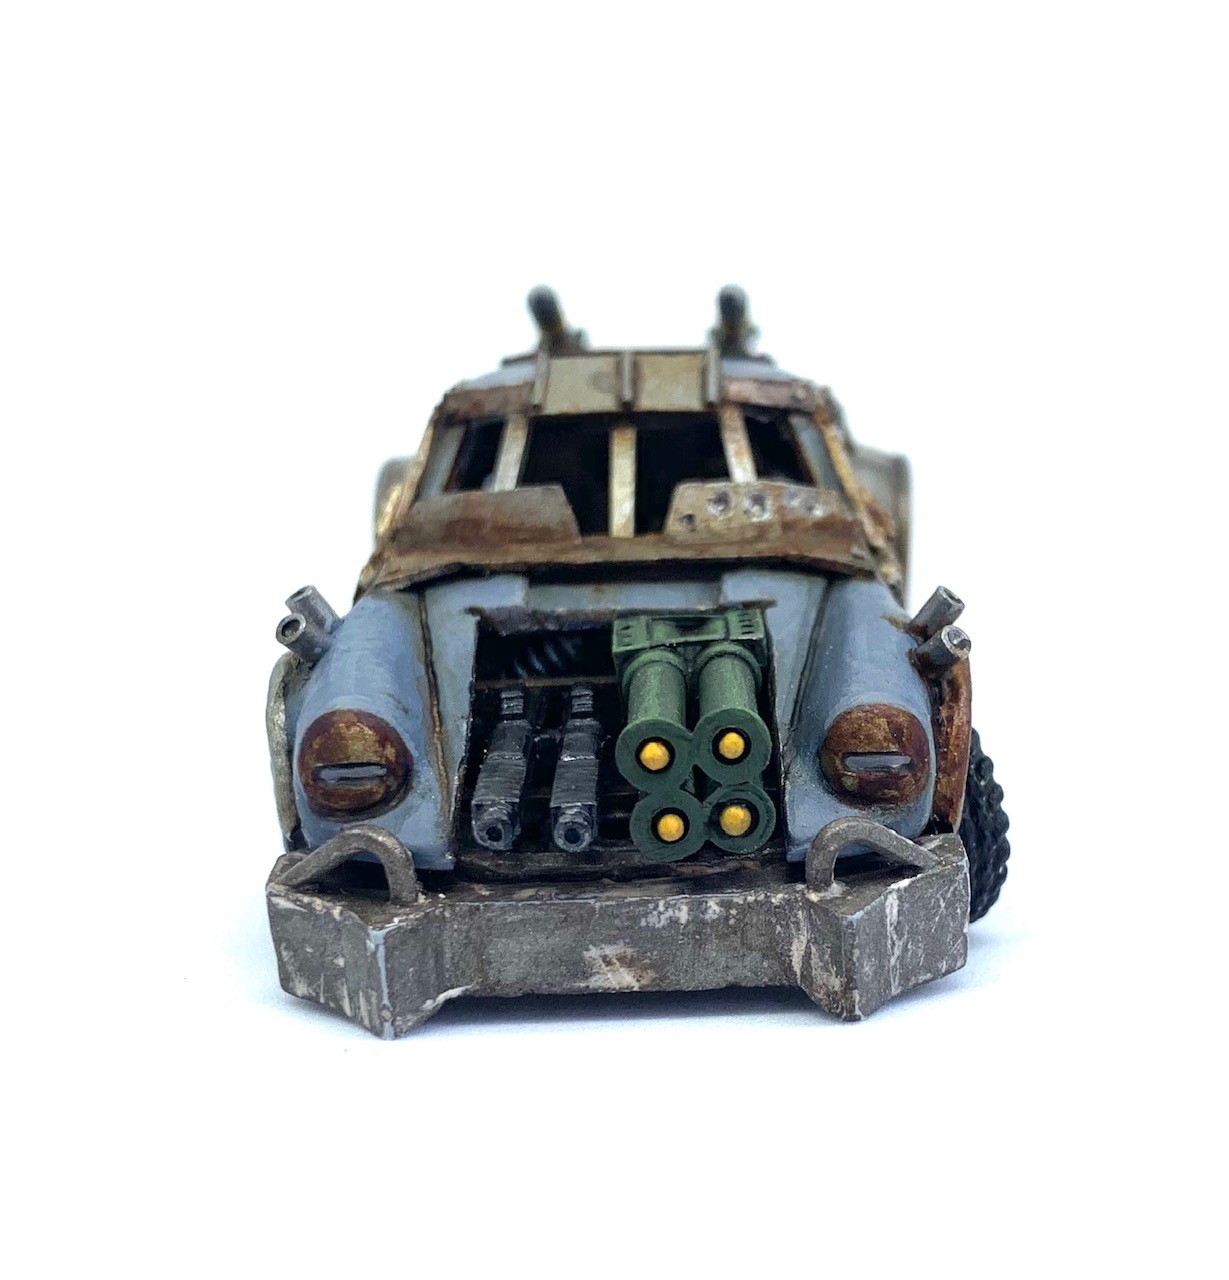
The bumpers on the prototype seem to have body filler applied all over to fill in gaps, scratches and dents, so I replicated this effect by first painting them a dirty metal (GW Leadbelcher mixed with Typhus Corrosion), applied some white plastic putty all over the bumpers, and removed most of it with some clay shapers leaving it in the grooves nicks and scratches I made during the build.
It’s not really possible to make out the internal detail when the car is put together but since I built it all, I painted it all too. Then the whole model was finished with some subtle black lining with watered down nuln oil.
Final Thoughts
In the final analysis there are several areas where I ended up deviating noticeably from the car in the film, mostly due to time and/or practicality but also in some cases to better show off the inside detail: the machine guns are too long; there is no plating welded onto the front wheel arches/fenders; there are only 2 smoke launchers per side at the front rather than 3; there is no internal roll cage; there are 2 back mounted missiles, not 4; the rear spoiler as mentioned in update #9, and the lack of side windows. Despite this the model feels at least to me like a faithful replica of the prototype and most of all I’ve learnt a hell of a lot about crafting small structures from tiny bits of plasticard!